")
AI-Powered Document Metadata Retrieval with Local Large Language Models
For one of our clients, we were working on a RAG-based system for document retrieval.
LanceDB and other VectorDB storage systems use PDF and ePub metadata as an Index to retrieve the most relevant information.
Vectorizing metadata in a Retrieval-Augmented Generation (RAG) system involves converting text-based metadata into numerical representations (embeddings) that can be stored and searched alongside the main document embeddings. This allows for more precise and efficient retrieval of information by combining semantic similarity search with metadata filtering. Essentially, you’re enriching your vector database with structured information that can be used to narrow down search results before or during the vector similarity search.
https://docs.lancedb.com/core/filtering
We did a quick check on the health of our documents, and it didn’t look good. The metadata was missing from about 80% of the files. We completed a search on the internet for an easy way to edit the metadata,
There was nothing. No easy-to-use tools are available to automate the editing of document metadata.. We realised we would need to come up with a solution, so we came up with 3 options:
- Write an extremely long Python script – hundreds of thousands of lines of code, doable, but time-consuming.
- Use Workflow Automation / MCP Toolkits – connect the AI to our SQLite3 database and Files. What if the AI model hallucinates and deletes our data or files?
- Use already existing software – Calibre eBook software. Open source and has all the tools to embed metadata into the files. Useful, but doesn’t have AI Integration.
We are using AI to chat with our Documents, let’s use AI to organise them aswell !
The Best Solution:
The best solution would be to design a plugin for Calibre. We needed the ability to review the Metadata that the AI generated from the documents, before making any drastic changes to the files. Calibre has that feature built in. We also wanted the ability to dedupe and export the documents into a folder structure ready for RAG. We could use Calibre as a screening, organising and exporting system. Why reinvent the wheel?
If we were to create a plugin, we could bundle llama/llamaindex and an AI model to make it self-contained. However, this would create too many moving parts and make the plugin’s filesize too large.
To make it user-friendly, it would be better to bridge the gap between a selection of powerful open-source projects. That gives the end user full control, ultimate flexibility and ease of use to install different models.
We could hijack the internet downloading system of Calibre and feed in responses from the AI for review.
The Plugins:
We developed 2x Calibre Plugins and 2x helper plugins to make working with documents a breeze.
- AI Metadata Plugin – A plugin that sends the books to the AI and pushes the response into Calibre’s metadata review system.
- AI Tag Extractor Plugin – Because of custom metadata saving restrictions in Calibre for metadata source plugins, we developed a separate UI plugin. Its purpose is to ask the AI custom questions and extract the data into our custom fields. (Very helpful for RAG)
- AI Metadata Helper Plugin – A toolbar button for automatically toggling the built-in metadata plugins off, starting up the AI metadata plugin. Once the metadata has been received, it auto-toggles the built-in plugins back on again. Allowing you to switch between internet metadata and AI metadata with a single click of the button.
- Download Internet Metadata Helper Plugin – After searching the user guide and online forums, I realised that Calibre doesn’t have a toolbar option to download metadata, you have to click a little drop down next to “Edit Metadata” then click “Download Metadata”, then on the pop up that appears click “Metadata Only”, that’s 3 clicks, when it should only be one. This plugin adds a toolbar button to download metadata from the internet using the built-in metadata plugins with a single click.
Pre-requisites:
Minimum a PC, Server or Laptop with:
- CPU with support for AVX
- 4GB System RAM
or:
- GeForce GTX 7 Series or Higher (Maxwell architecture)
If you are trying to run AI Models on a Windows 95 Laptop, you may as well give up now 😆
Getting Set Up:
I’ll go through setting up your environment. We will first install Calibre and the
Digital Assassins AI Plugins, then we will install AnythingLLM and install a Large Language Model locally. The AI Model will be used to read the books and provide the metadata. Then I will show you how to get an API key from Anything LLM and configure the Plugins. All the software & plugins are open source and free to use.
1) Installing Calibre
If you already have Calibre installed on your machine, you can skip this step.
First things first, we want to install Calibre. You can download the software here:
https://calibre-ebook.com/download
For this demo, we will show you how to install it on Windows.
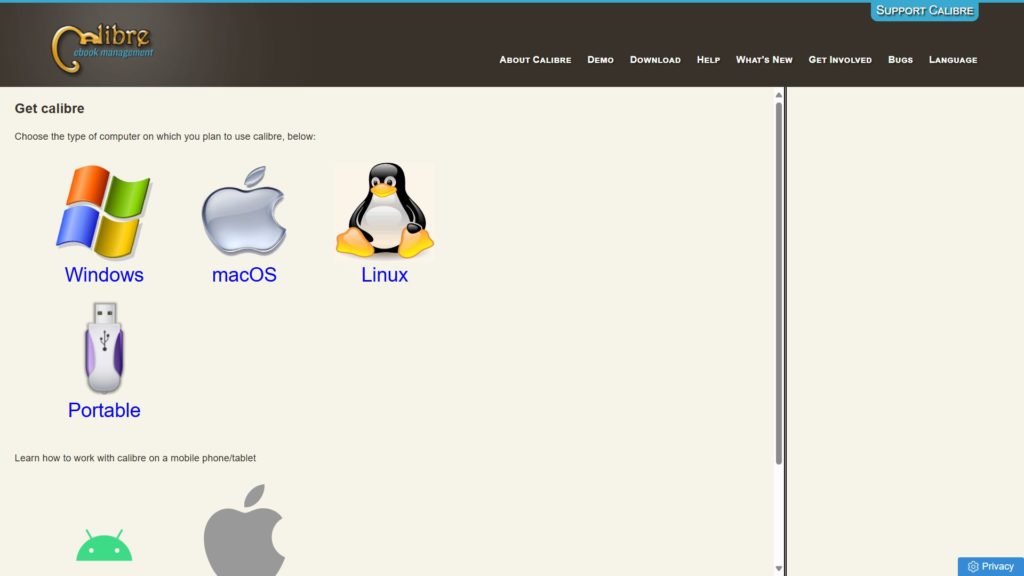
Choose your operating system of choice. Both Calibre and AnythingLLM are supported on desktop for Windows, Linux and Mac. We have tested our plugins on Windows and Linux, but they should work on Mac, but it isn’t officially supported.
Once the file has been downloaded, open the downloaded .msi file to start the installation.
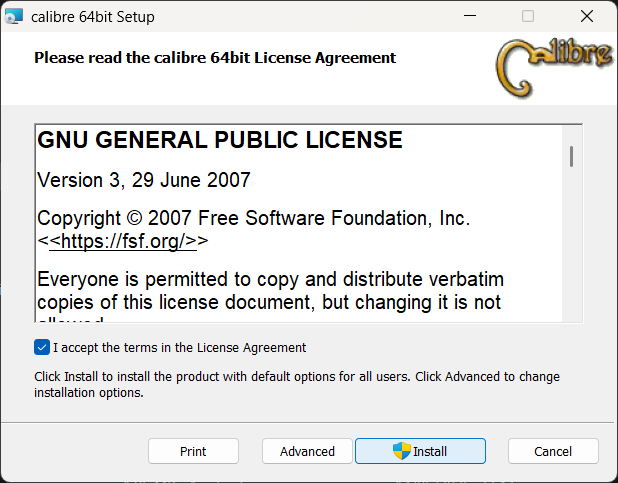
Tick the “I Accept” checkbox to accept the licence and then click “Install”
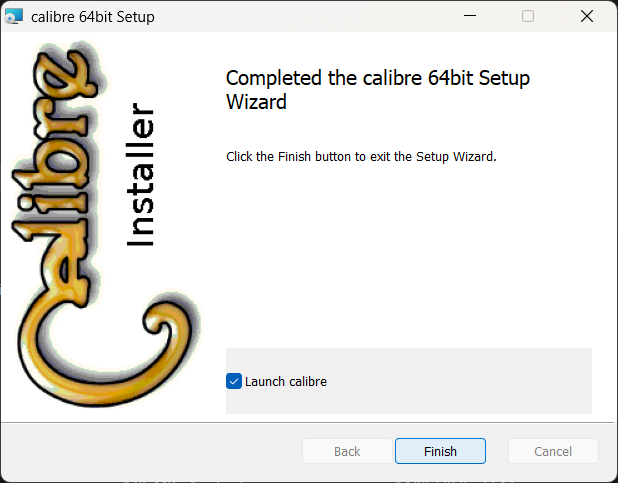
Calibre has now finished installing. Tick the “Launch calibre” checkbox and click “Finish”
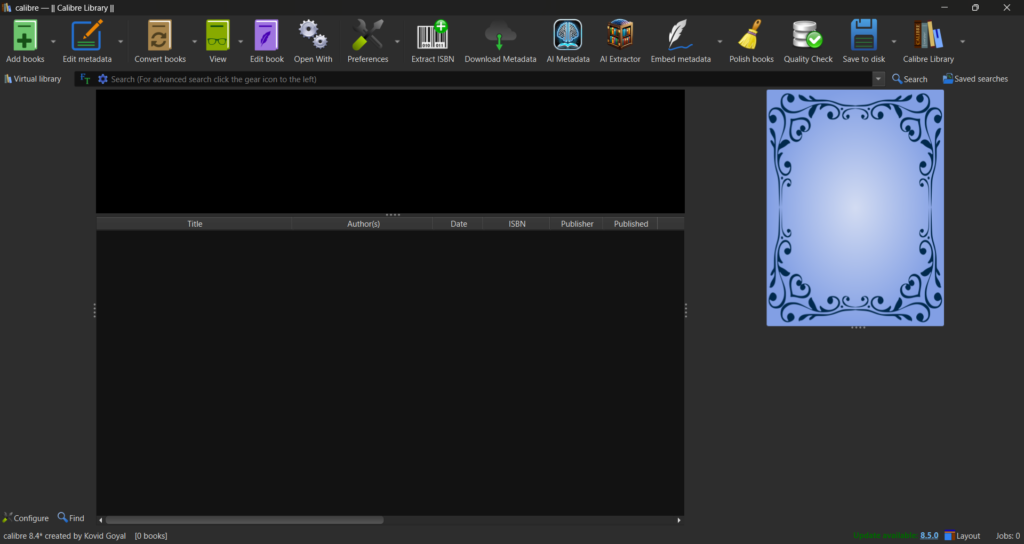
You will be presented with the blank Calibre interface. If you would like more information on how to use the interface in more detail, you can find the user guide here: https://manual.calibre-ebook.com/
2) Downloading & Installing the Plugins
The next step is to download and install the plugins. You can download & install the separate plugins that you require individually if you wish. Alternatively, you can download all the plugins bundled in the
AI-Toolkit.zip package.
Download Links:
| Plugin Name | Size | Download |
|---|---|---|
| AI Metadata Plugin | 416kb | Download |
| AI Tag Extractor | 1.96mb | Download |
| AI Metadata Helper Button | 823kb | Download |
| Download Metadata Helper Button | 5.96kb | Download |
| AI Toolkit (Bundle) | 3.17mb | Download |
If you download the plugins individually, you do NOT need to unzip them.
With the bundle, you must unzip it first before installing each plugin into Calibre.
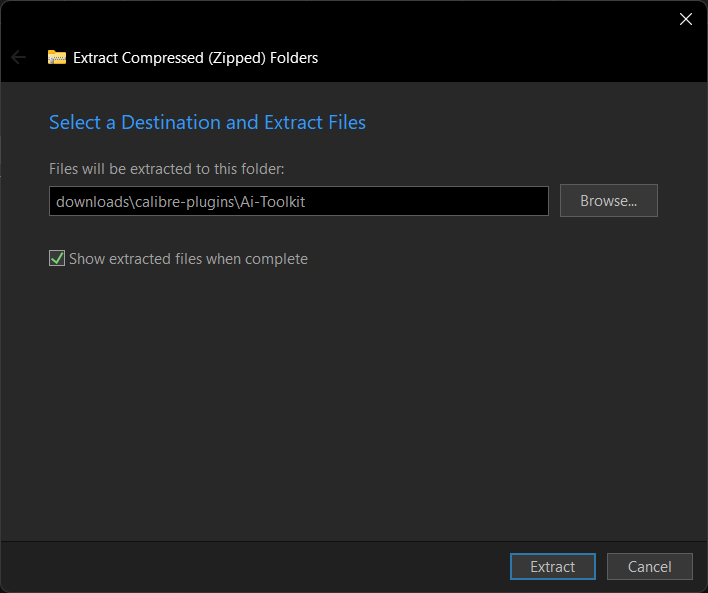
Extract the AI Toolkit into a folder on your computer. You can use Windows File Explorer, Winzip, Winrar, 7-Zip, or your favourite unzipping tool.

You should now have 4 files in your unzipped folder ready to install into Calibre.
Installing the Plugins into Calibre:

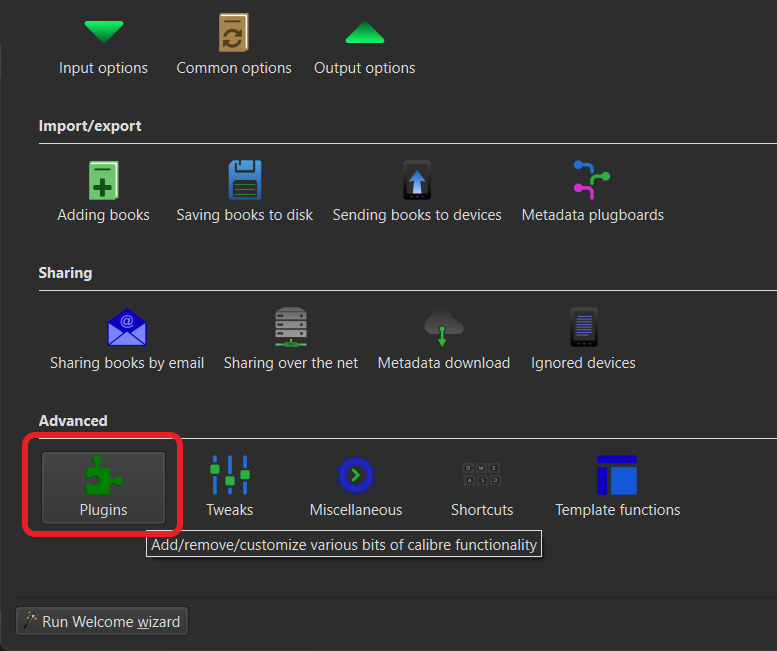
Now go back to Calibre and click the “Preferences” icon in the toolbar to open the Calibre Preferences page. Located on the top toolbar.

Click “Plugins” under “Advanced” at the bottom of the preferences window.
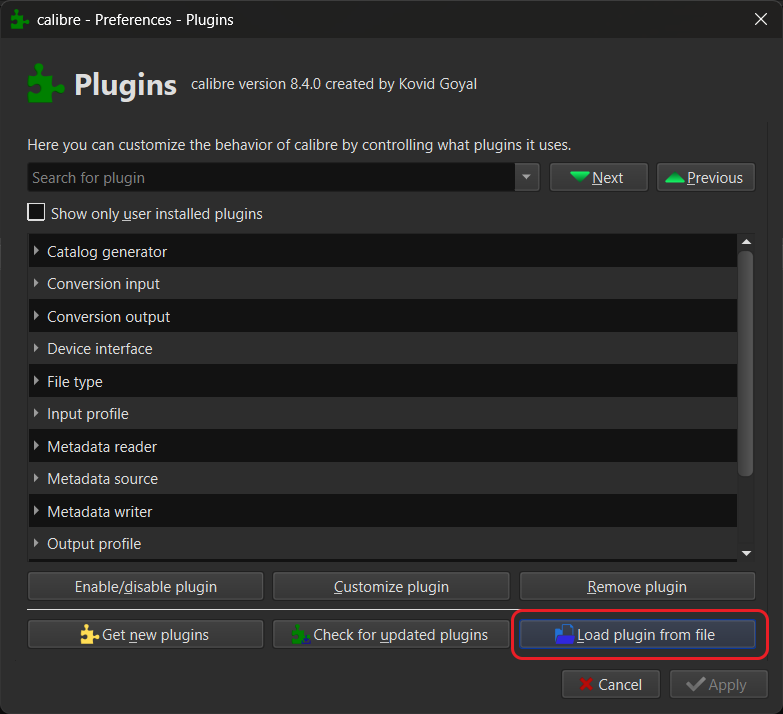
Within the Plugin Manager page, click “Load plugin from file”
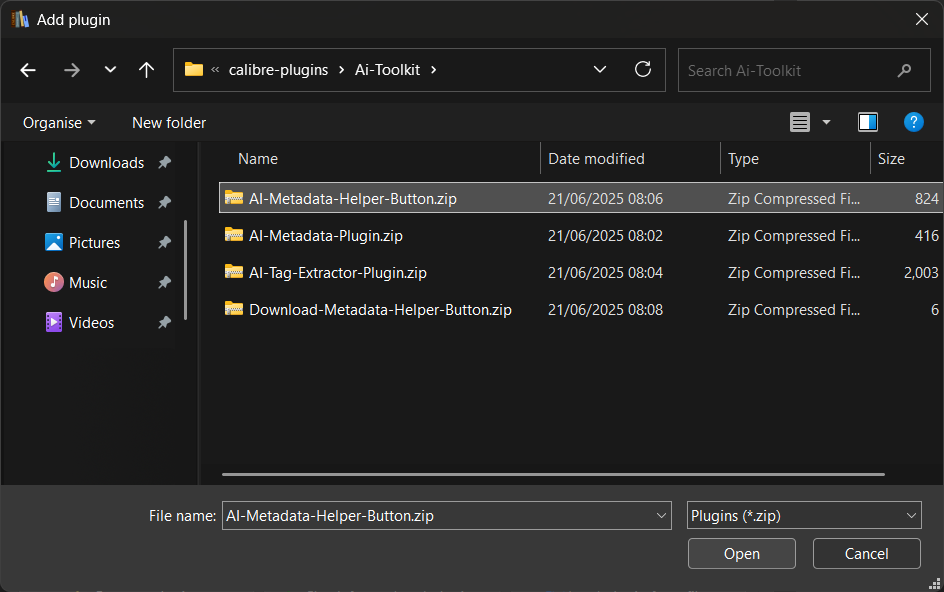
Navigate to the folder where you unzipped the AI Toolkit, select the first plugin in the list and click “Open” to load the plugin into Calibre.
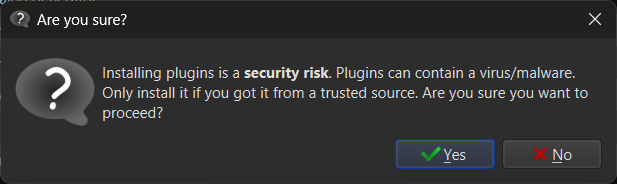
A warning will pop up advising you of the security risks of Installing Plugins from Untrusted sources. Click “Yes” to proceed.
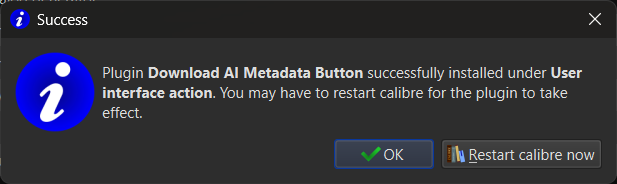
You will be notified that Calibre needs to be restarted for the plugin to take effect.
Click “Ok”, then repeat the above steps to install all 4x Plugins into Calibre.
Once you have installed the last one, choose “Restart Calibre now” to trigger a restart, and the plugins will be loaded into Calibre.
Customising the Toolbar:
Now that we have installed the plugins, we can customise the toolbar to make our lives easier. To do that, we go back to the “Preferences” menu.
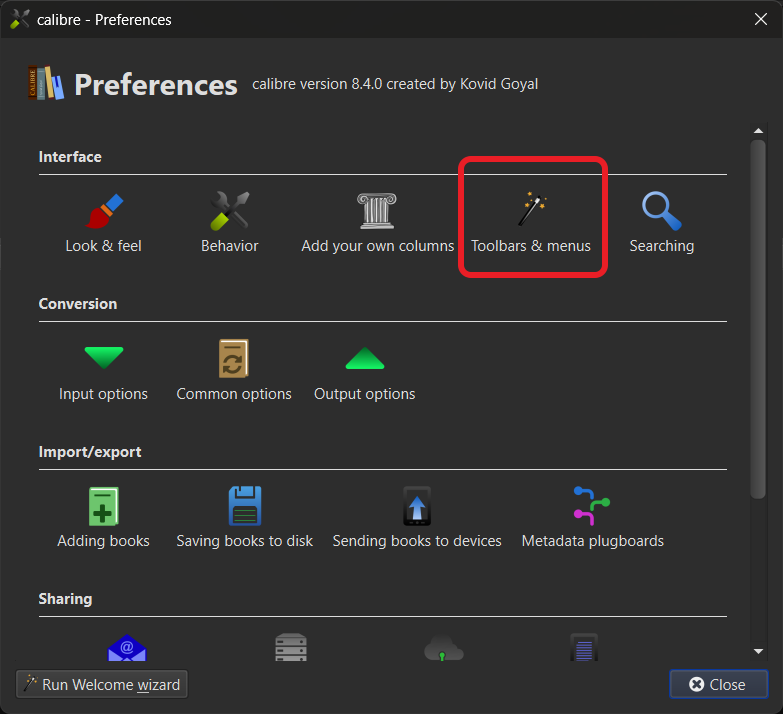
This time, from under the “Interface” category, choose “Toolbars & menus”.
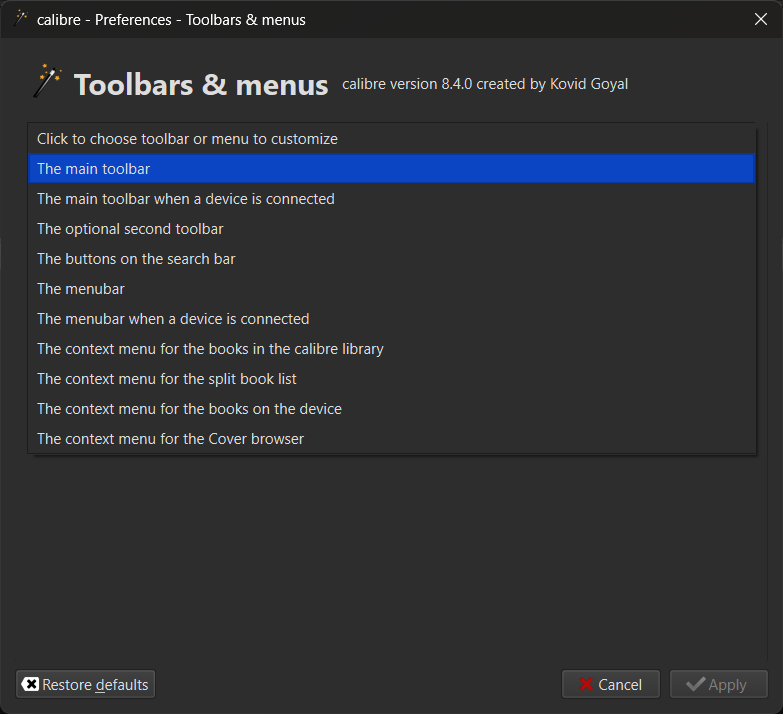
In the dropdown, choose “The main toolbar”
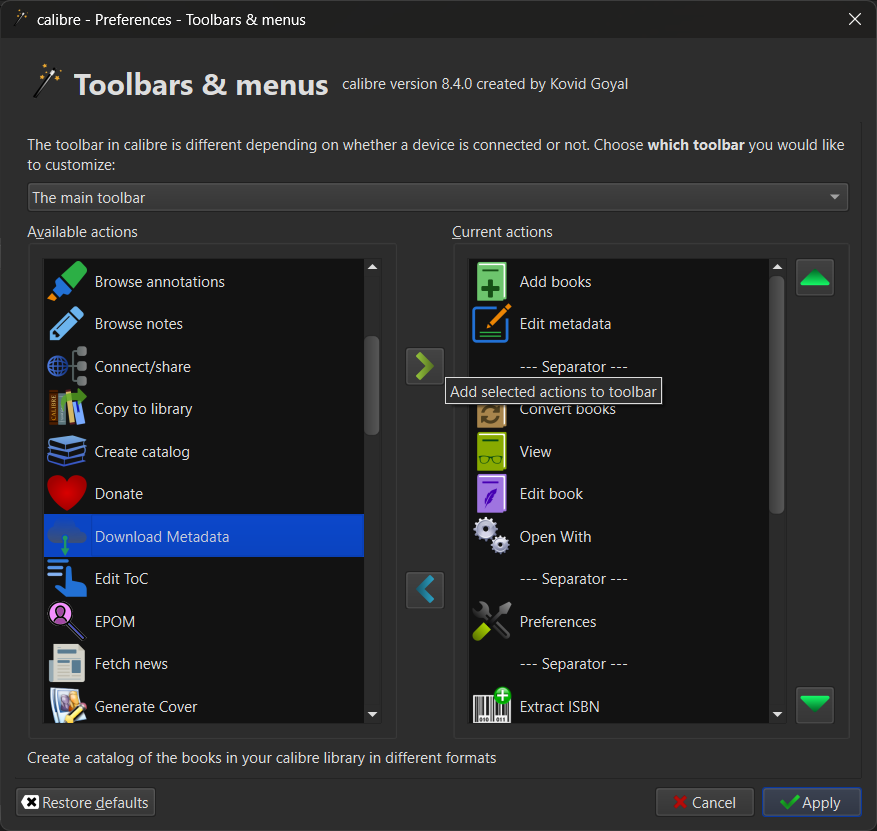
In the list on the left-hand side, choose “Download metadata” and click the Green right arrow in the middle of the window to add the plugin shortcut to the Toolbar. Now repeat this for:
“AI Metadata” & “AI Extractor”
You can organise the order to your liking, using the green up and down arrows on the right-hand side of the window. When you are happy, click “Apply”.

You should have 3x items in your top toolbar that look like the above, depending on what order you chose to put them in.
- “Download Metadata” helper button – allows us to single-click download metadata from the internet using the built-in plugins.
- “AI Metadata” helper button – Auto switches off your selected internet metadata plugins, switches on the AI Metadata plugin, and once the information is received, switches off the AI Metadata plugin and re-enables your internet metadata plugins for ease of use.
- “AI Extractor” button – opens the AI Extractor Interface to extract information from our books and documents.
We are configured so far, the next step is to install Anything LLM and download an AI model for Calibre to use.
3) Installing AnythingLLM
If you have already installed Anything LLM and have set up a model, you can skip the next two steps and jump to “Configuring the Plugins”.
If you haven’t got Anything LLM installed, we will start by downloading the Desktop version from the Anything LLM Website:
Visit the website and click “Download for Desktop”
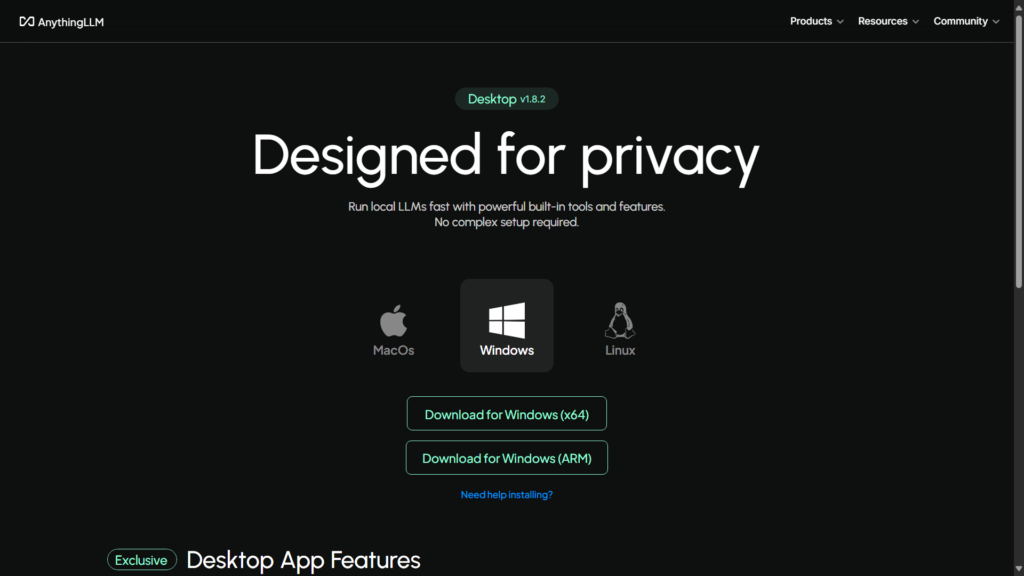
Choose your Operating System and then click “Download”
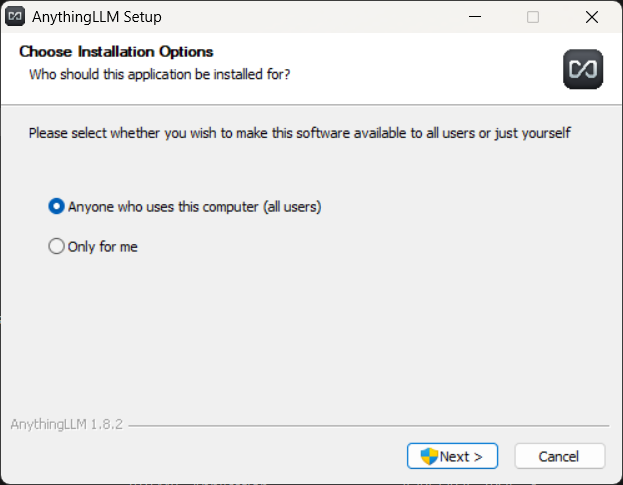
Leave the option “Anyone who uses this computer” selected. If it isn’t selected, please select it and click “Next >” This will install the program as an Administrator.
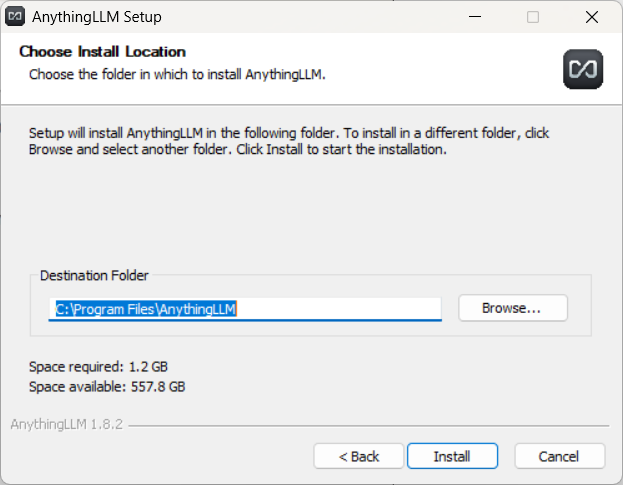
Choose the destination folder you would like to install the program. Leaving the default is fine.
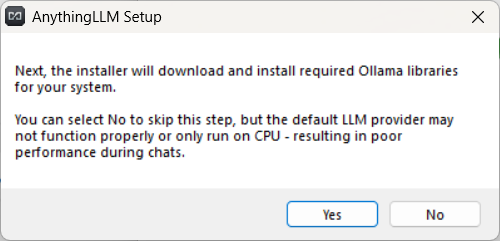
You will want to install Ollama libraries for your system, so click “Yes” to proceed. Once the process has finished downloading the libraries, click “Finish”, and you have successfully installed AnythingLLM.
First Set Up:
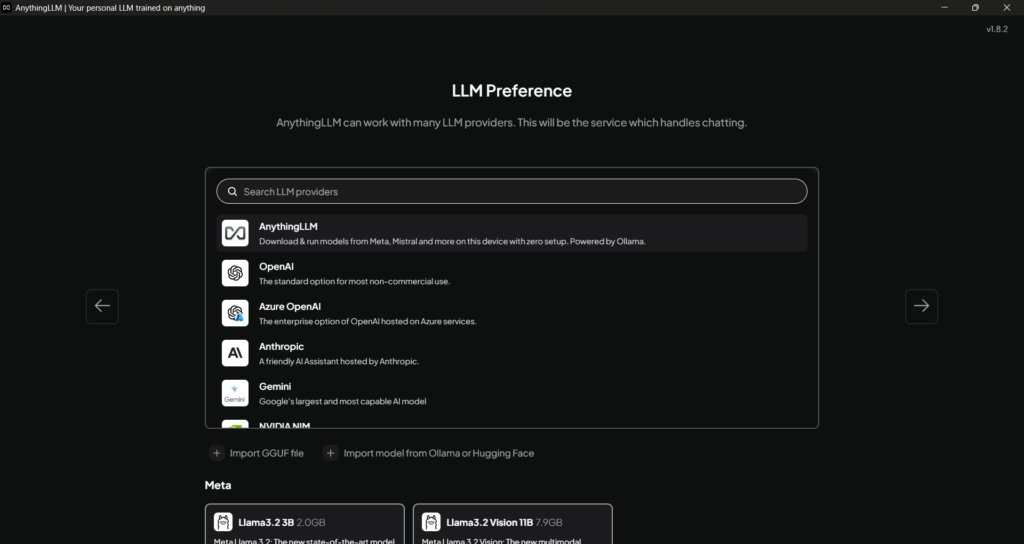
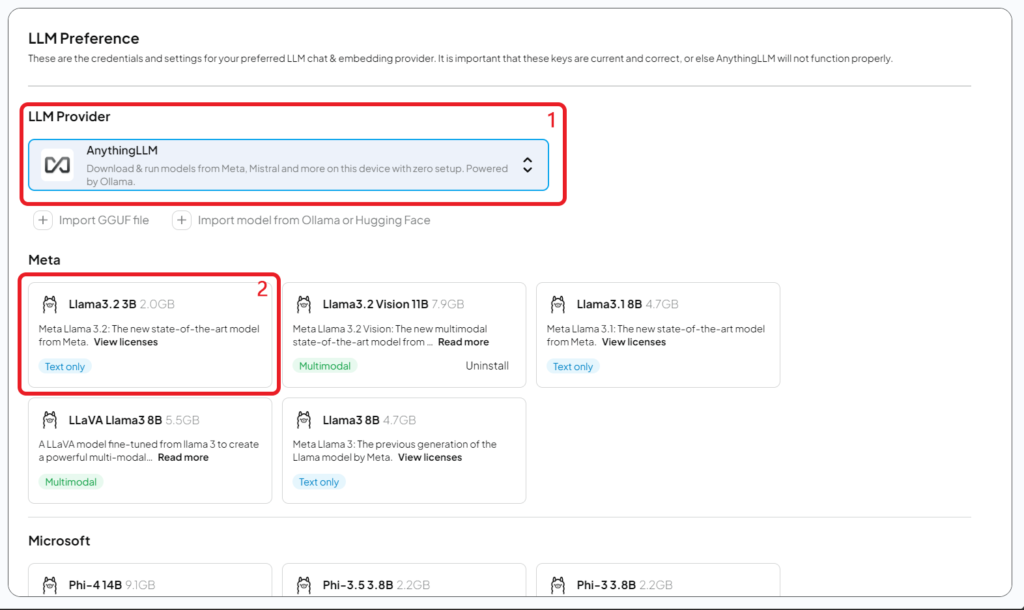
AnythingLLM should have opened automatically; if it didn’t, launch it from your start menu. You will be presented with selecting an LLM Provider, pick “AnythingLLM” for your Provider.
If you have used Local AI before, you probably already have a favourite model. If you haven’t, Llama3.2 is a good starting choice as it’s popular and relatively powerful. A bonus is that it’s small and can run on old hardware. If you have a beefy PC with a high-powered graphics card, you can go for the more powerful models with a larger number of parameters.
Identifying Parameters:
The number followed by the letter B, next to the model name, lists the number of parameters, e.g. Llama3.2 (3 Billion Parameter Model). The 3B at the end is the parameters. Notice you have models with 8B, 11B, etc..
Your mileage will vary based on your hardware. You can run a higher parameter model on a CPU or an old graphics card, but it will probably be painfully slow. Try a few models and see what you prefer, as well as what your hardware can handle. New laptops & PCs aimed at AI workloads should work well.
Click “Right Arrow ->” on the right-hand side of the screen to continue.

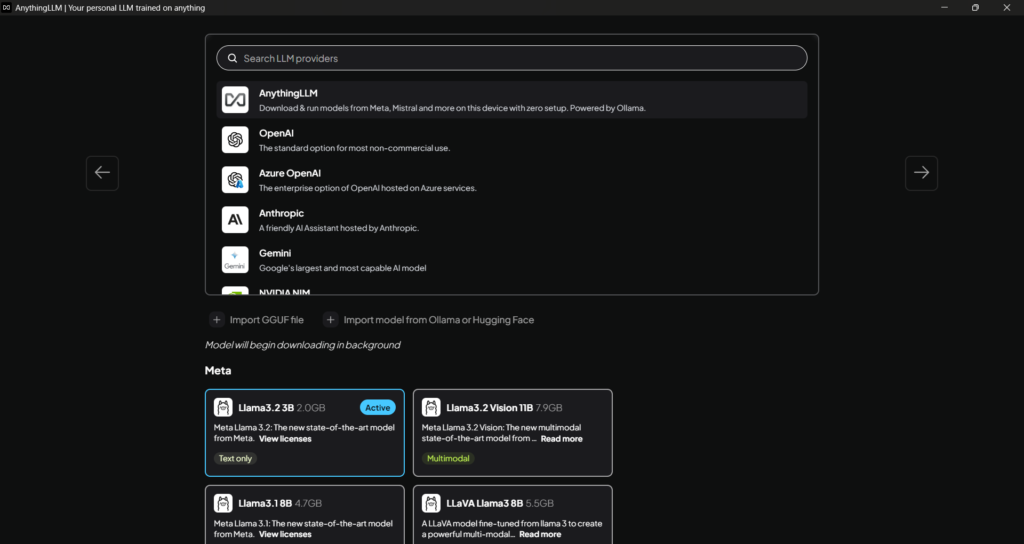
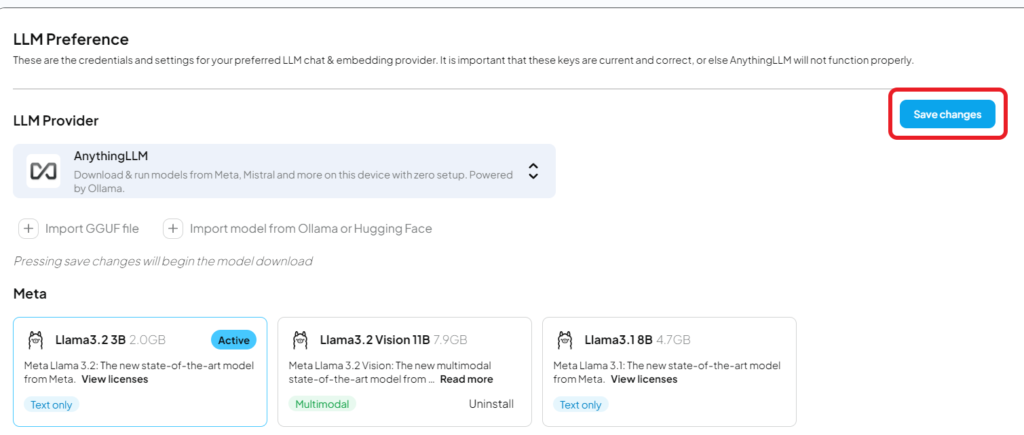
The Next screen shows you what you have chosen. You will notice in the top right-hand corner of the screen Llama 3.2 is downloading in the background. Click “Right Arrow ->” on the right-hand side of the screen to continue.
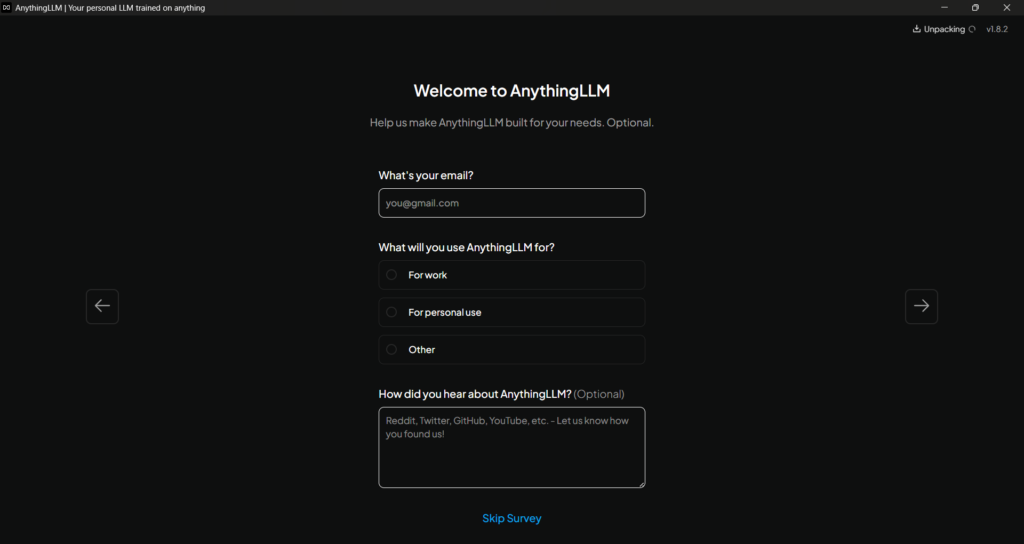
You can complete the survey if you wish, or click “Skip Survey” at the bottom if you want to skip.
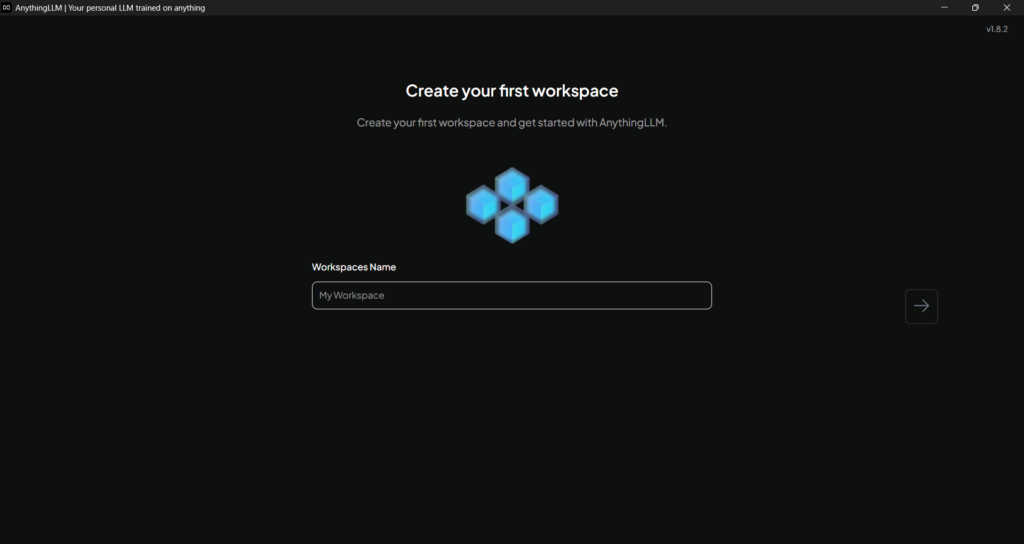
Next is to create a workspace. A good starting point is to create a personal workspace, in case you would like to play about with Local AI models for personal use, type “Personal” into the Workspace Name text box and click the “Right Arrow ->” on the right-hand side of the screen to continue.
AnythingLLM is now installed..
4) Getting an API Key

We click the “Open Settings Wrench” at the bottom left of the application.
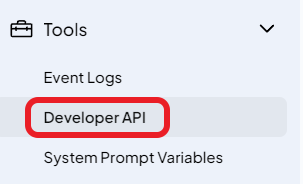
Scroll down to Tools > “Developer API”. We can generate an API for the next step, which is configuring the plugins.

On the API Keys Page, click “Generate New API Key” A key will be generated for you. Keep this page open for the next step, as you will need the API key to configure the plugins.
5) Configuring the Plugins
The next step is to go back to Calibre and configure the plugins with the API key so Calibre and AnythingLLM can communicate. We now go back to Calibre and click the “Preferences” button.
Choose “Plugins” to open up the plugin options window.
Setting up the AI Metadata Plugin:

This time, tick the checkbox that says “Show only user-installed plugins”, then drop down the metadata source tab to reveal your installed plugins. Double click on “AI Metadata” by Digital Assassins.
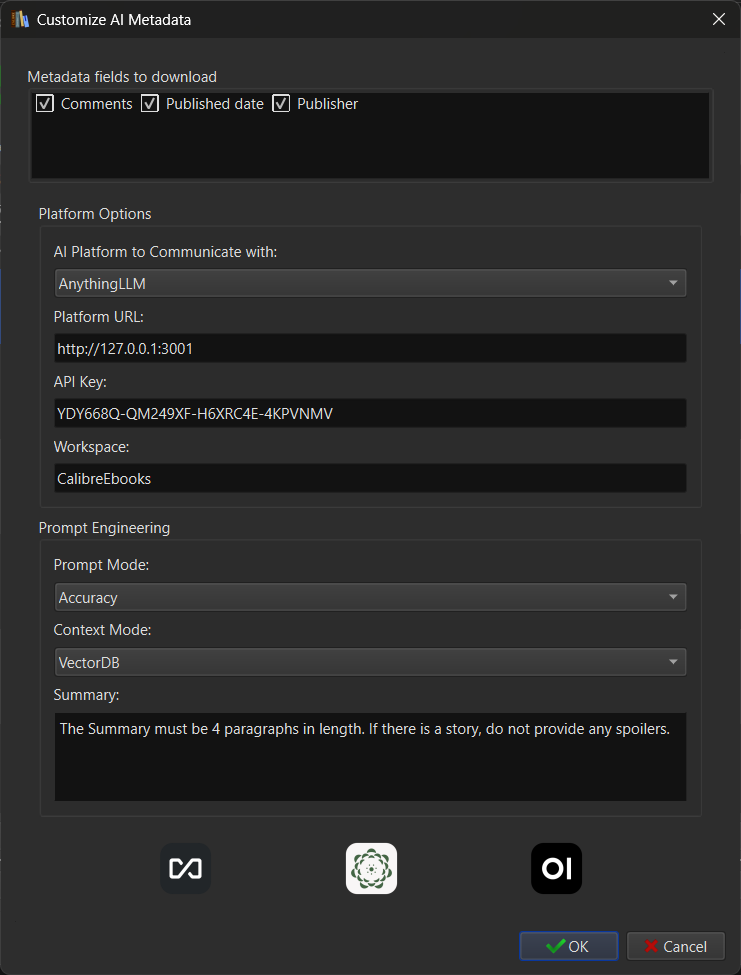
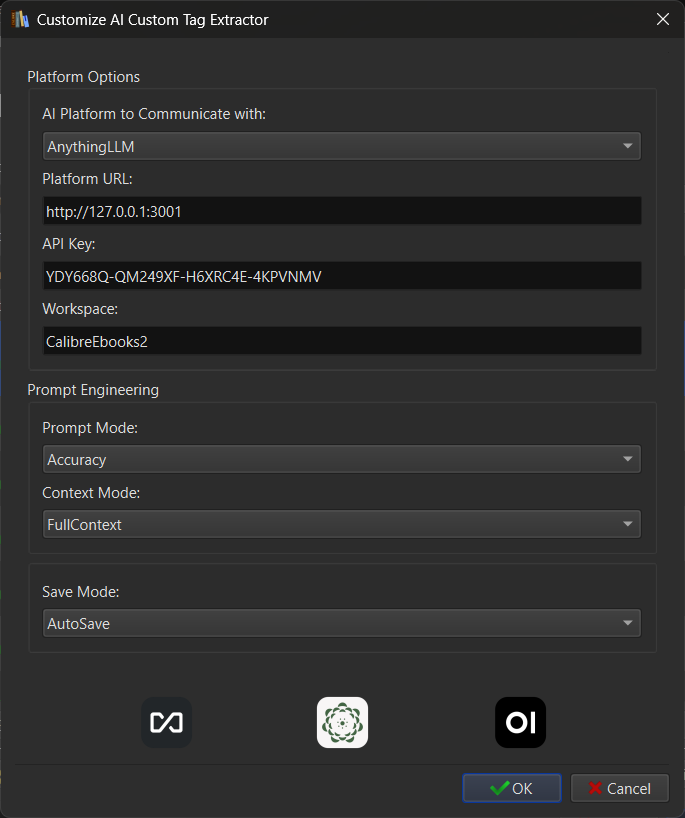
We need to complete the settings so we can successfully communicate with AnythingLLM.
We select AnythingLLM for the platform to communicate with.
Platform URL:
If you are running Calibre and AnythingLLM on the same computer, you can leave the default:
http://127.0.0.1:3001If you are running AnythingLLM on another computer on your local area network, you will need to change the IP address to match that computer.
API Key:
Go back to Anything LLM and copy your API key, highlight the key, right-click and then click “Copy”. Switch back to Calibre, right-click inside the API Key box and click “Paste”.
Workspace:
You can either go back to AnythingLLM and set up your own Workspace if you know what you are doing, then enter the workspace name here exactly as it appears in AnythingLLM (Case Sensitive).
If you do not want to or know how to configure a Workspace yourself, the plugin can set up and configure the Workspace automatically for you. Enter a name for the new Workspace. You could choose something like “Calibre” or “Calibre Documents”, or “Calibre Ebooks”.
Summary Engineering:
This lets you modify the summary to your needs, e.g. you can tell the AI the number of paragraphs you want, if you want to avoid spoilers, or if you require the summary in multiple languages.
Before embarking on a large batch job, I recommend running a few tests with this on a single book, just as a test, to see what works best for you.
Prompt Mode:
You have three choices: Efficiency, Accuracy or Summarise
- Efficiency Mode: Sends the question to the AI in a single prompt. This is quick, as it only takes one round trip to receive the answer. The Embedding model will retrieve one set of results from the VectorDB to answer all the questions. (Quicker but sometimes less accurate)
- Accuracy Mode: Sends each question individually. This takes 8x longer as we must wait for the AI to answer 8 individual questions and the Embedding model to retrieve 8 separate results from the database to answer the set of questions. (Slower but more accurate)
- Summary Mode: Asks the AI to provide a summary only. This mode is useful if all you need to complete your metadata collection is a summary for each book.
If you are unsure which mode to choose, pick Efficiency. It will work o.k in most cases. You can always run a few checks to see which mode suits your hardware and needs.
Context Mode:
You have two options:
- VectorDB: asks the embedding model to search the database and retrieve a selection of snippet results to answer the question.
- Full Context: It will try and load the full book into the AI context window. This can be useful because the AI will have read the full book to answer the question. If the model you have chosen doesn’t have a large enough context window or the book is too large, the book will be truncated (Cut off with the end missing)
If you don’t understand it, Vector DB will work in nearly all cases. Full context can provide better answers in some scenarios. You could always test both and see which you prefer.
Setting up the AI Extractor Plugin:
The setup is nearly identical to the AI Metadata Plugin, with a few minor differences
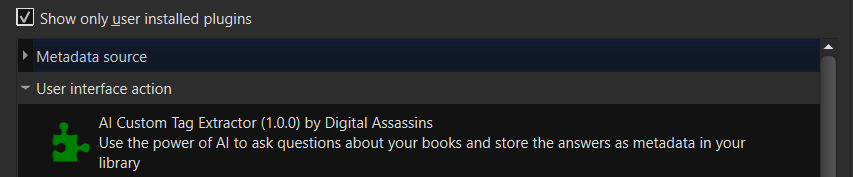
Go back and instead of clicking to drop down the metadata source tab, we click the “User interface action” tab. Then we double click on “AI Custom Tag Extractor” by Digital Assassins
One difference in this plugin is that it doesn’t have an AI summary mode, as the questions you ask the AI are your own that will be saved into your custom metadata fields.
Save Mode:
You have two options to choose from:
- Review Mode: This asks the AI your custom questions for all the books you highlight. When the job is complete, you can review the information. You can then discard the results you don’t like and save the results that you do. This mode is great for small to medium jobs.
- AutoSave Mode: This asks the questions and saves the data automatically into Calibre after each question as it progresses. Useful for very long automation jobs where a power cut or other outage could cause you to lose hundreds of thousands of answers from the AI. I added this mode because it happened to me. You can always go back and edit the data afterwards. I would recommend this mode for very long jobs.
🥳Congratulations, you have just set up the AI toolkit and you’re ready to Rock and Roll.. 🎉
Let’s get down to business..
6) Using AI Metadata Plugin & RAG to retrieve Metadata.
The AI Metadata Plugin is used to find the basic metadata for a book. Basic metadata isn’t available on the internet for the majority of rare, out-of-print and self-published books. This is where this plugin excels.
Once we are set up, extracting Metadata from our eBook or document collection couldn’t be easier; it’s just a matter of clicking a single button.
Adding the Books:
If you have already added your books to your Calibre library, you can skip the next step.

Click the “Add Books” icon in the top left-hand corner of Calibre.
Select the books you want to add to Calibre from the file selection window and click “Open”. Alternatively, we can drag and drop all the books into the Calibre main window.
It would be too easy to use a collection of well-known eBooks; Calibre could easily identify them using its built-in metadata tools. Let’s choose some user manuals from the Internet Archive, spice things up a little bit.
I chose some manuals and user guides that are available here: https://archive.org/details/manuals. I will use a few that I picked at random for this demonstration: Nintendo 64 Instruction Manual and a Heckler & Koch MP5 Submachine Gun Operator’s Manual.
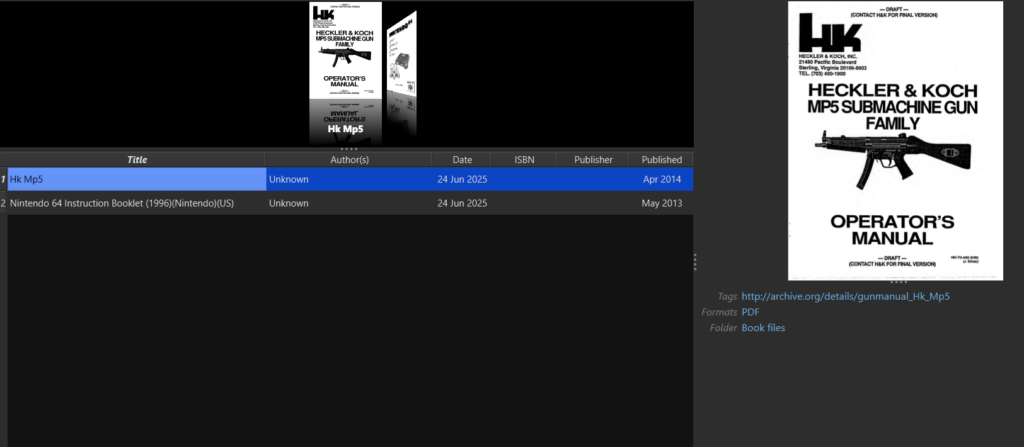
The books are now imported into the Calibre interface and ready to be analysed by the AI. You can see that Calibre has automatically extracted the “Title” of the book, but the “Author” is Unknown; it also couldn’t find any other information from the in-built metadata tags. This isn’t Calibre’s fault; the publisher or distributor of the content hasn’t saved this information into the correct Metadata fields inside the files for Calibre to read.
Testing the Built-in Calibre Metadata Tools on non-eBook documents:
It’s guaranteed that there will be no information on Amazon, Google Books, and Goodreads for these document types. This is where combining Calibre with AI excels. Let’s run a quick check using the built-in metadata plugins to see what information we receive.
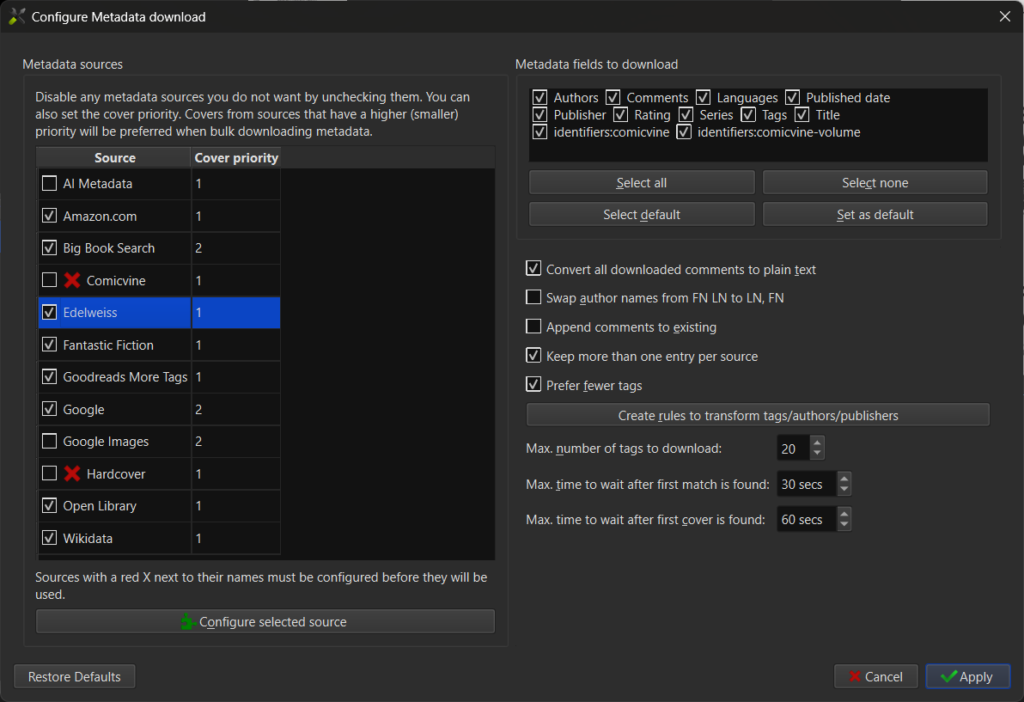
I have checked every single built-in metadata plugin available as a source, excluding the AI Metadata plugin.

Now we click “Download Metadata” in the top toolbar menu to start the process.
Here is our example for the Nintendo 64 Instruction Booklet. It says “Nintendo 64 Survival Guide” by “J.Douglas Arnold”. That is not the document in question and is a false positive.
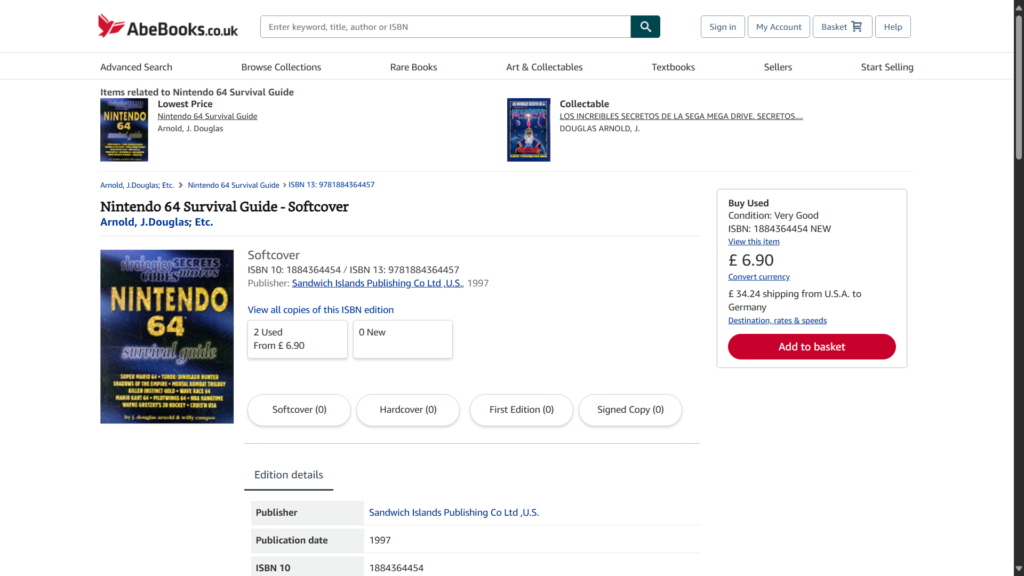
A Quick Google Search reveals this is a book on codes and secrets for the N64 console, which is what we expect to find when we search an eBook database for documents that have not been published.
Now let’s retrieve the metadata from the document itself using AI.
Starting the AI Metadata Retrieval Process:

We highlight all the books we want to send to the AI. You can do this by clicking “CTRL+A” on Windows to select all or by clicking the top book in the list, then holding down the “SHIFT” key and clicking the final book in the list.
Alternatively, you can hold down CTRL and click each book you want to select individually.
Next, click the “AI Metadata” Icon in the top menu toolbar to start the process.

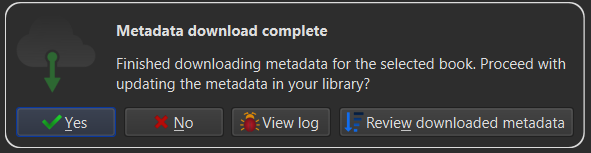
A pop-up will appear saying “Metadata download started”, that is it!
We wait for the AI to do its thing, then we can review the returned Metadata.
Checking the Process:
For this demonstration, I will show the results of the Command Line Interface as the process proceeds.
Checking Workspace...
Workspace: CalibreEbooks Found
Checking if Document has already been Uploaded..
Document Doesn't Exist!
Uploading Document to Workspace..
Document Uploaded Successfully!
Embedding Document into Workspace..
Document Embedded!
Pinning Document into Workspace..
Document Pinned!
Creating New Chat: Hk Mp5 Unknown pdf return the ISBN from the book or document
Chat Created!
Asking A.I. Question..
Return the ISBN from the book or document.
A.I. Thinking.....
------------------------------------------------------------
############             Response:              ############
------------------------------------------------------------
 { "ISBN": "Not Available" }
------------------------------------------------------------
Response Received Successfully!
A.I thinking took 9.25 seconds!
Creating New Chat: Hk Mp5 Unknown pdf return the publisher of the book or document
Chat Created!
Asking A.I. Question..
Return the publisher of the book or document.
A.I. Thinking.....
------------------------------------------------------------
############             Response:              ############
------------------------------------------------------------
 { "Publisher": "Heckler & Koch, Inc." }
------------------------------------------------------------
Response Received Successfully!
A.I thinking took 3.07 seconds!
Creating New Chat: Hk Mp5 Unknown pdf return the Date of Publication
Chat Created!
Asking A.I. Question..
Return the Date of Publication.
A.I. Thinking.....
------------------------------------------------------------
############             Response:              ############
------------------------------------------------------------
 { "PublicationDate": "2014/04/02" }
------------------------------------------------------------
Response Received Successfully!
A.I thinking took 2.91 seconds!
Creating New Chat: Hk Mp5 Unknown pdf return the author of the book or document
Chat Created!
Asking A.I. Question..
Return the author of the book or document.
A.I. Thinking.....
------------------------------------------------------------
############             Response:              ############
------------------------------------------------------------
 { "Author": "Heckler & Koch, Inc." }
------------------------------------------------------------
Response Received Successfully!
A.I thinking took 3.0 seconds!
Creating New Chat: Hk Mp5 Unknown pdf return the title of the book or document
Chat Created!
Asking A.I. Question..
Return the title of the book or document
A.I. Thinking.....
------------------------------------------------------------
############             Response:              ############
------------------------------------------------------------
 {   "Title": "Heckler & Koch – MP5 Submachine Gun – Operator's Manual" }
------------------------------------------------------------
Response Received Successfully!
A.I thinking took 3.42 seconds!
Creating New Chat: Hk Mp5 Unknown pdf return the genre of the book or the literary genres this books content would fit into
Chat Created!
Asking A.I. Question..
Return the genre of the book or the literary genres this book's content would fit into.
A.I. Thinking.....
------------------------------------------------------------
############             Response:              ############
------------------------------------------------------------
 { "Genre": "User Manual" }
------------------------------------------------------------
Response Received Successfully!
A.I thinking took 2.93 seconds!
Creating New Chat: Hk Mp5 Unknown pdf please provide your own summary of the book or document
Chat Created!
Asking A.I. Question..
Please provide your own summary of the book or document. The summary should be clear, concise, and written in your own words. 4 paragraphs in length.
A.I. Thinking.....
------------------------------------------------------------
############             Response:              ############
------------------------------------------------------------
 {   "Summary":
"This document serves as a comprehensive operator's manual and parts list for the Heckler & Koch MP5 submachine gun family. It details safety procedures, maintenance guidelines, and a detailed breakdown of the weapon's components. The manual emphasizes the importance of strict adherence to safety rules, including treating every weapon as loaded, ensuring a clear line of sight, and thoroughly inspecting the weapon before handling. It provides step-by-step instructions for clearing the weapon, emphasizing the removal of the magazine, rotation of the ejection port, and inspection of the chamber to confirm it is empty.  The manual includes a detailed parts list, categorized by functional groups such as clamping sleeves, ratchets, handguards, magazines, and carrying slings. Each part is identified by a unique part number and diagram reference, facilitating easy identification and ordering of replacement parts. The parts list covers various configurations of the MP5 family, including the MP5A2, A3, SD, N, SF, MP5/10, and MP5/40 models, acknowledging the diverse applications and user preferences within law enforcement and military sectors.  Beyond the technical specifications and parts breakdown, the document incorporates a weapon service record section. This section is designed for tracking maintenance performed on the weapon, including the number of rounds fired, user names, and any relevant remarks. This record-keeping aspect highlights the importance of regular maintenance and responsible weapon handling to ensure optimal performance and longevity. Overall, the document is a practical guide for operators and maintenance personnel responsible for the safe and effective use and upkeep of the Heckler & Koch MP5 submachine gun. It combines essential safety protocols, detailed parts identification, and a system for tracking maintenance history, providing a valuable resource for those working with this widely-used weapon system."
}
------------------------------------------------------------
Response Received Successfully!
A.I thinking took 12.44 seconds!
Creating New Chat: Hk Mp5 Unknown pdf identify all primary languages the book or document is written in
Chat Created!
Asking A.I. Question..
Identify all primary languages the book or document is written in.
A.I. Thinking.....
------------------------------------------------------------
############             Response:              ############
------------------------------------------------------------
 {   "Language": ["English"] }
------------------------------------------------------------
Response Received Successfully!
A.I thinking took 3.15 seconds!
Starting Cleanup Process...
Deleting Embedding..
Document Embedding Removed!
Deleting Individual Document..
Document Deleted Successfully!
Deleting Document Folder..
Documents Deleted Successfully!
Deleting Threads...
Thread Deleted Sucessfully!
Thread Deleted Sucessfully!
Thread Deleted Sucessfully!
Thread Deleted Sucessfully!
Thread Deleted Sucessfully!
Thread Deleted Sucessfully!
Thread Deleted Sucessfully!
Thread Deleted Sucessfully!
Threads Deleted Sucessfully!
Cleanup Process Complete!
If you want to view the output of the AI process, you can access the Job Log from within the plugin folder. On Windows, the file is located at:
%appdata%\calibre\plugins\AI Metadata - Job.logReviewing the Results:
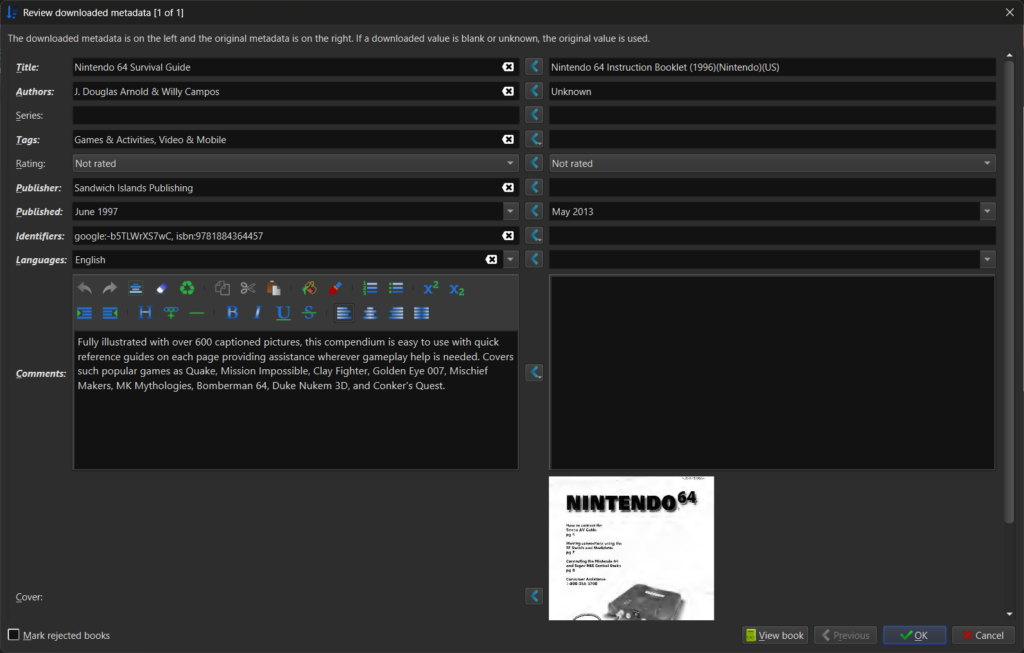
Once the metadata has been downloaded, we can click “Review Downloaded metadata”
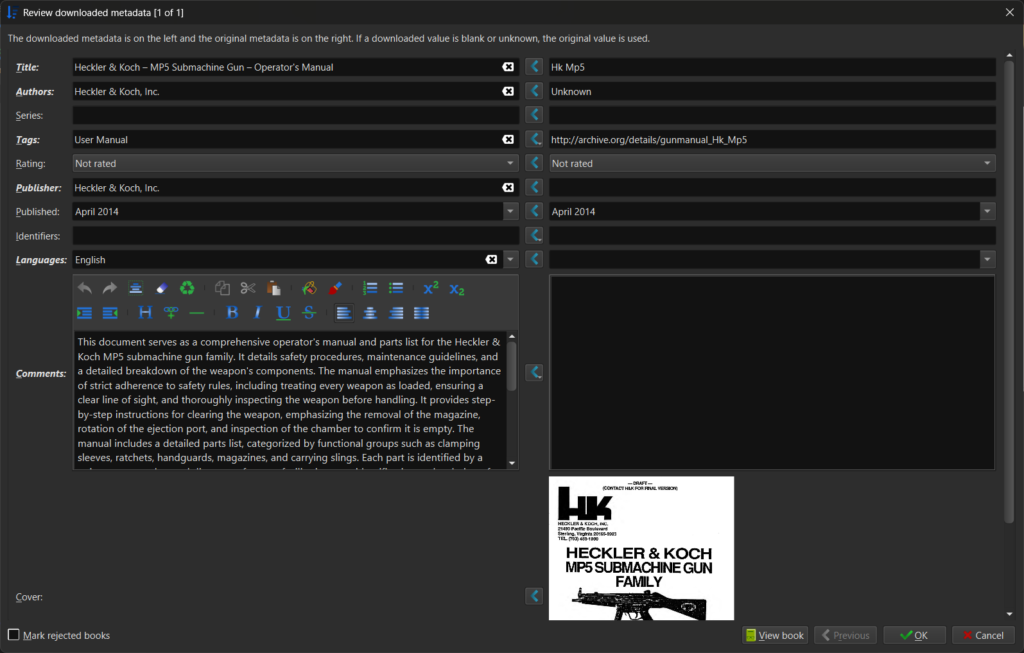
As you can see, the metadata has been returned from the AI and dropped into Calibre’s “review metadata” system. This allows us to review each metadata record in sequence and make any corrections if needed. Once we are happy with the metadata, we can click “Ok” to accept a single item or “Accept All” for a collection of items. This is useful when we only want to do a few spot checks and approve the remaining items.
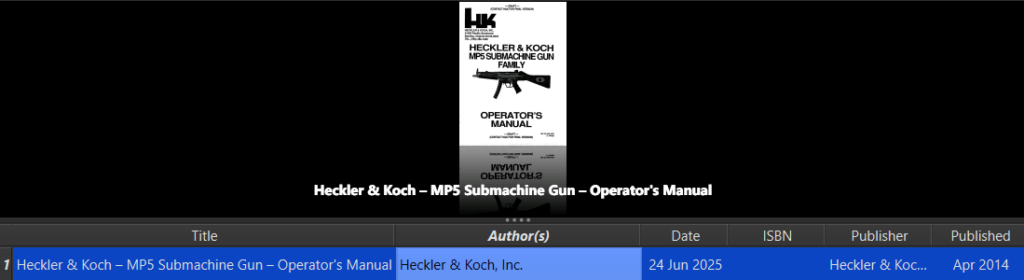
As you can see, all the metadata fields are added to Calibre in the correct columns.
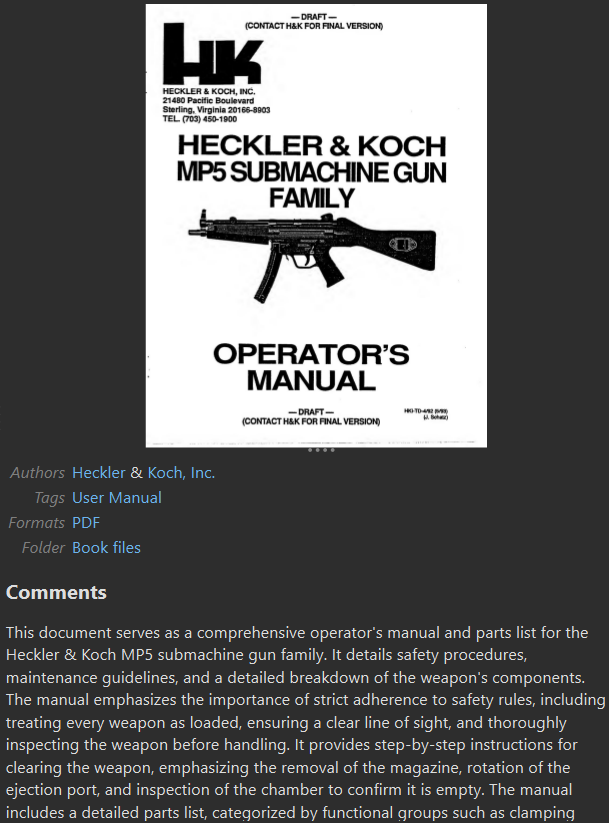
The Extended metadata, including the AI summary, is also saved alongside the document. All we have to do now is embed the metadata into the PDF / ePub files, and then we can export them ready for our collection or to import into our RAG workspace.
Finishing up:
Click “Embed Metadata” in the toolbar to start the embedding process.

Once complete, click “Save to disk” to export our documents out of Calibre to our file system.
🥳Process complete! You have just retrieved & embedded AI metadata into your documents 🎉
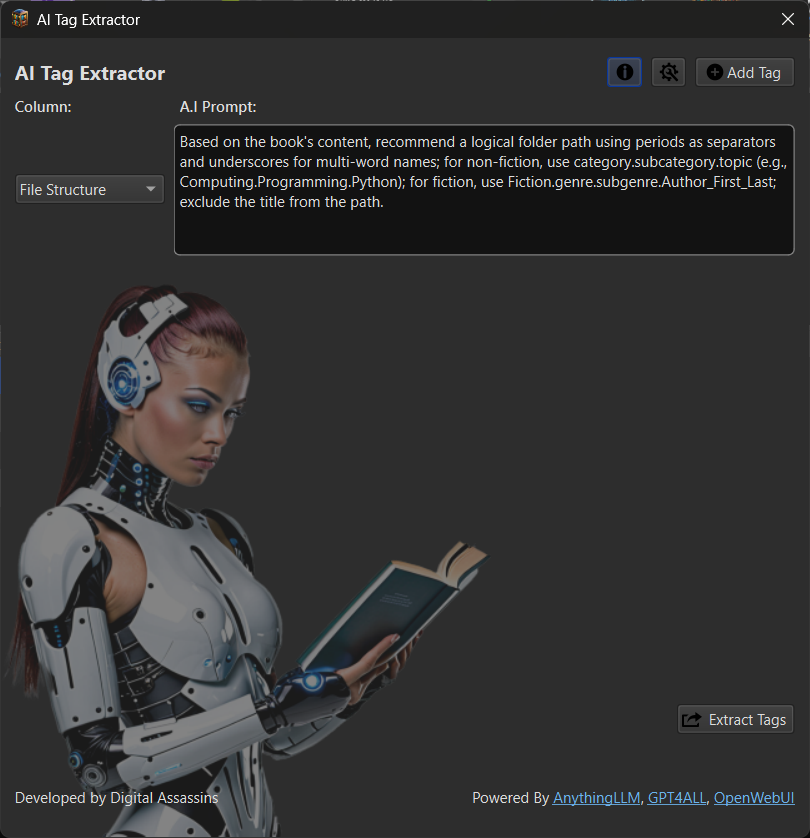
7) Using the AI Tag Extractor Plugin to ask your own questions.
The AI Tag Extractor plugin allows you to retrieve your own custom metadata from your book collection automatically using the power of AI.
What is this plugin useful for? You can extract information from a book that would require intelligence, that simply can’t be acquired using RegEx.
For instance, how can a RegEx match the main character, or work out who the Bad guy is in a story?
Unless the book states ‘BadGuy:‘ it’s impossible..
With Regex plugins, you also need to be proficient in RegEx, something that can bamboozle the average user who doesn’t understand coding.
With this plugin, you can use Natural language to extract the information required.
The Interface:
Click the “AI Extractor” button in the toolbar to launch the Plugin.
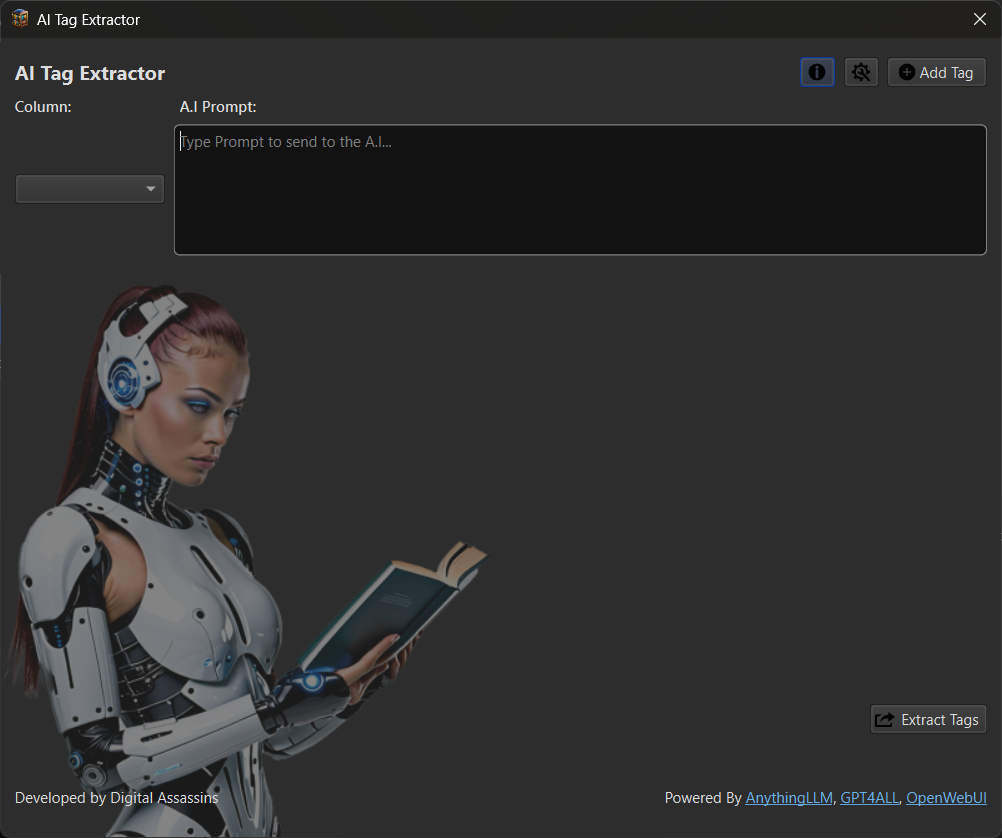
This launches the AI Extractor Plugin interface, which is pretty self-explanatory.
- AI Prompt box – Enter your prompt for the AI to ask questions on the book content.
- “Column” Dropdown – Where you would like to save the returned data (Custom Column).
I will demonstrate how to create a custom column to save our response into, then ask the AI a question, so you can see how the plugin works.
Adding custom columns:
First, we click “Preferences” in the toolbar menu.

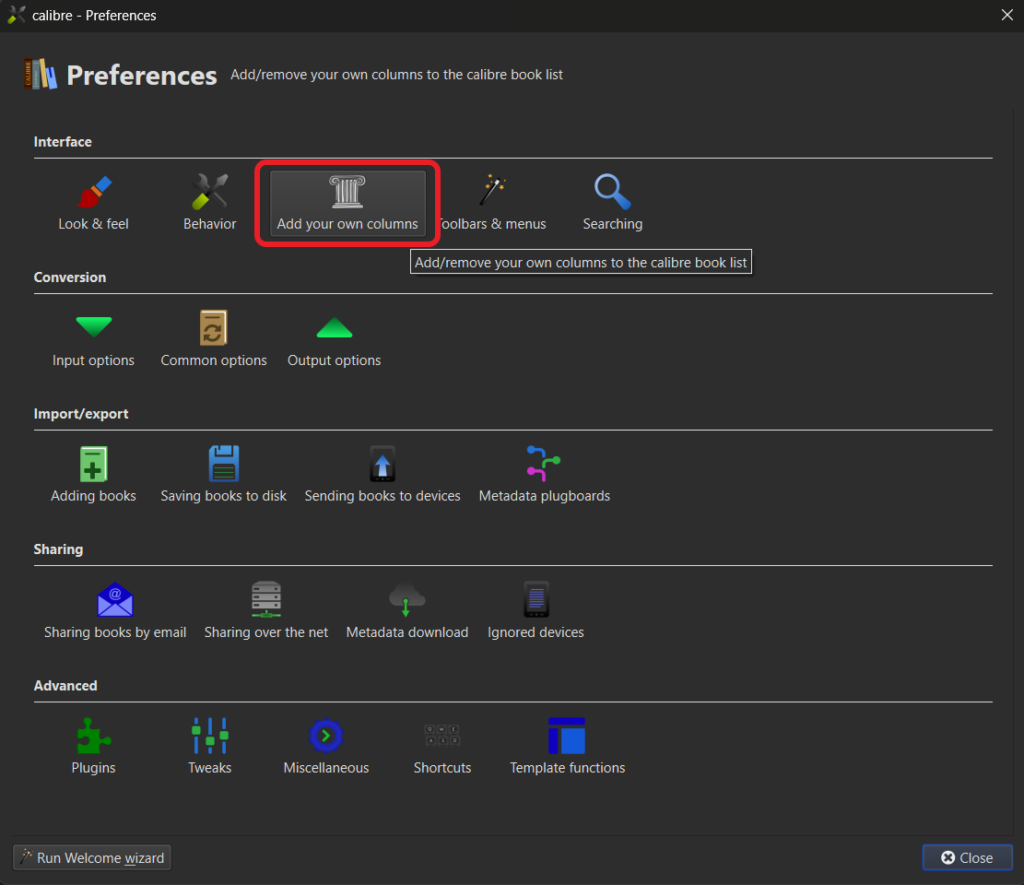
Click the “Add your own columns” button to open the custom column settings page.
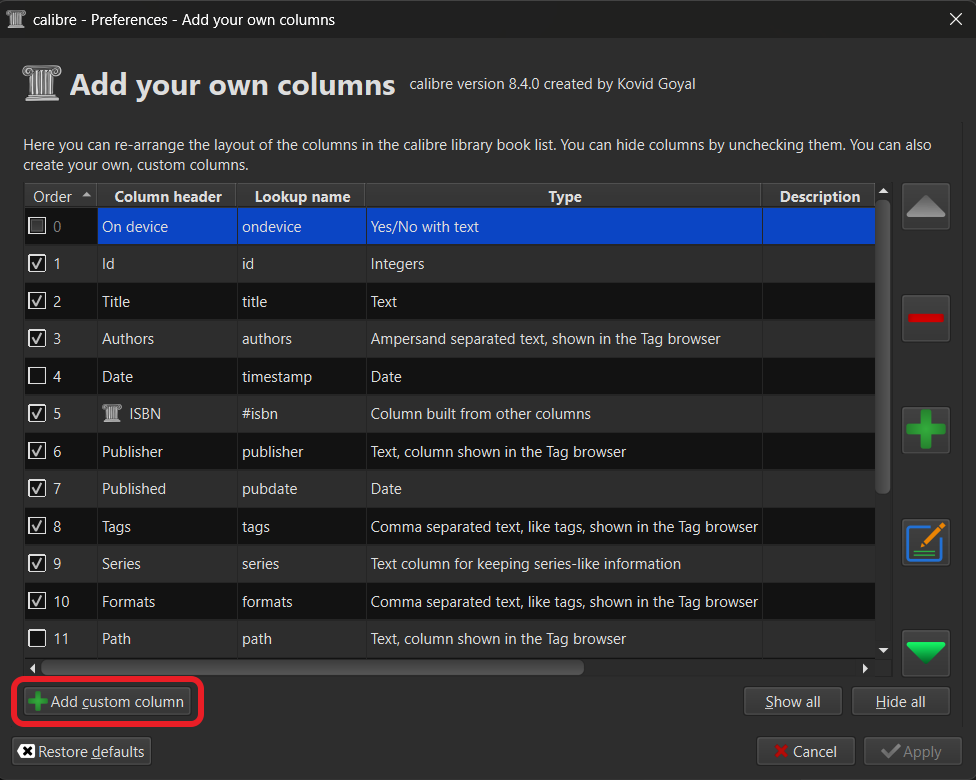
Click “+ Add Custom Column” to open the custom column entry interface.
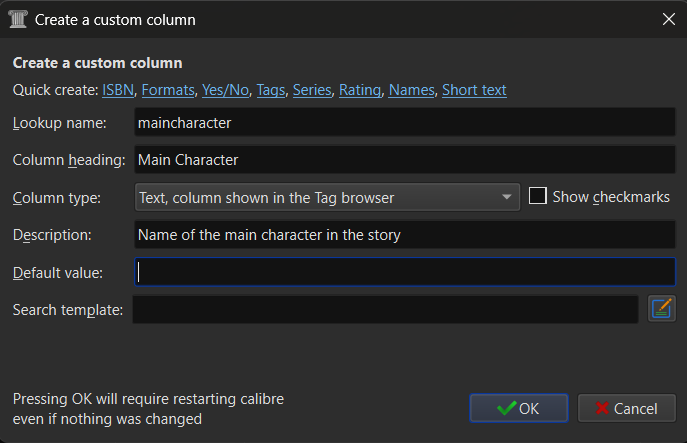
Main Character:
I’ve added a column called Main Character by completing the following fields:
- Lookup name: maincharacter
- Column heading: Main Character
- Column type: Text, column shown in tag browser
- Description: Name of the character in the main story
Clicking “Ok” will ask you to “Restart Calibre”
I repeated the process to add the following Custom Columns before restarting:
Dragons:
- Lookup name: dragons
- Column heading: Dragons
- Column type: Text, column shown in tag browser
- Description: Does the story contain Dragons?
Wizards:
- Lookup name: wizards
- Column heading: Wizards
- Column type: Text, column shown in tag browser
- Description: Does the story contain Wizards?
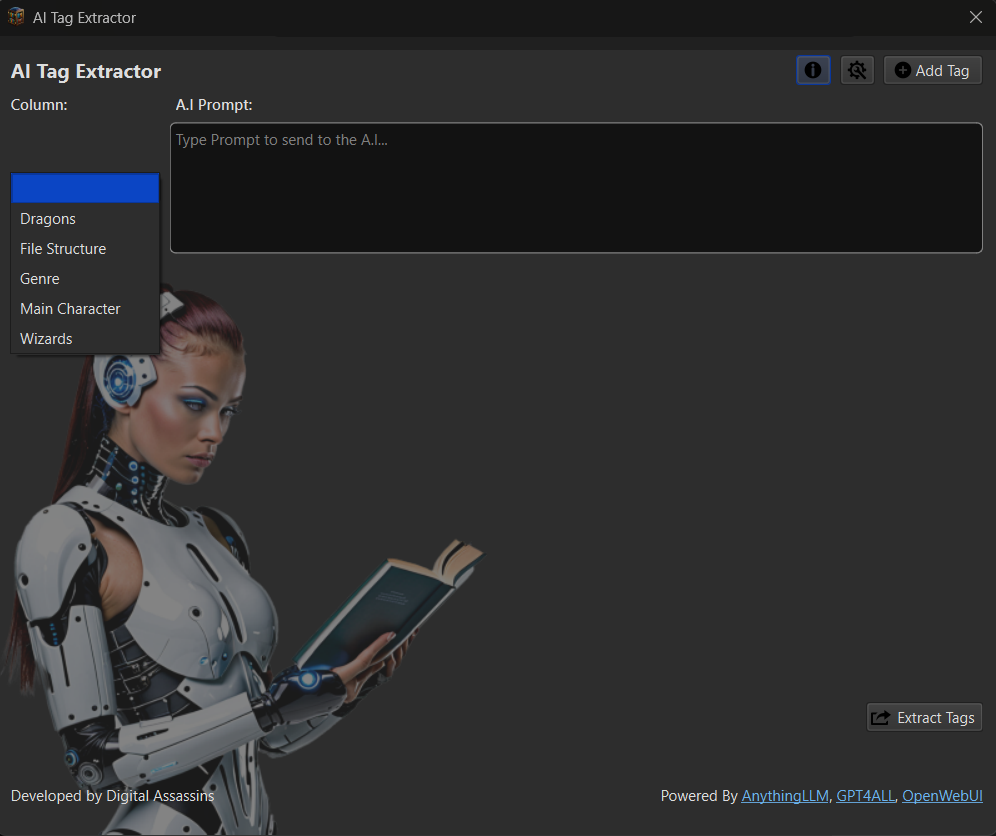
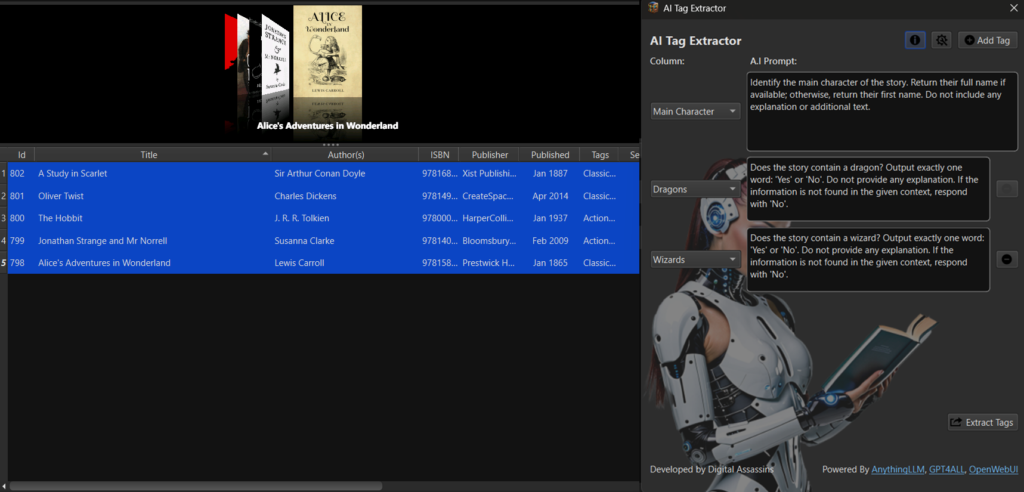
If we switch back to the “AI Extractor” plugin, you can see the custom columns we have just created are available in the Column drop-down box.
Setting up the prompts:
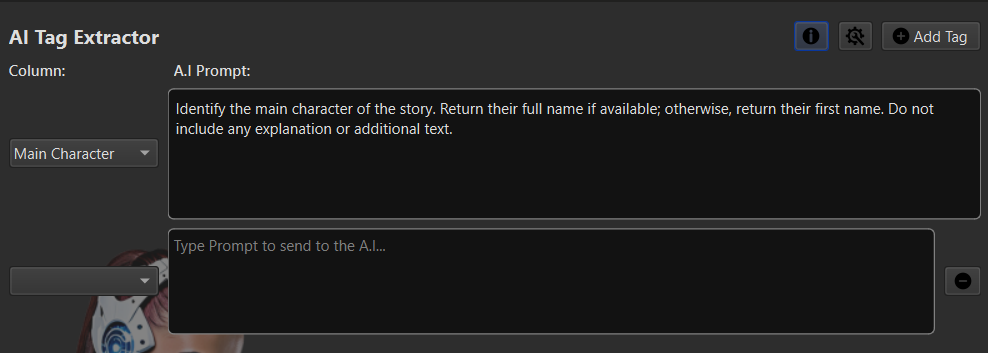
I selected “Main Character” from the list, then typed into the “AI Prompt” box:
Identify the main character of the story. Return their full name if available; otherwise, return their first name. Do not include any explanation or additional text.
To add another question to send to the AI, click the “Add Tag” button in the top-right of the plugin interface.
Another Column and AI Prompt input boxes have now appeared for us to use.
I repeated the above steps to add the Column: Dragons
Does the story contain a dragon? Output exactly one word: 'Yes' or 'No'. Do not provide any explanation. If the information is not found in the given context, respond with 'No'.And the column: Wizards
Does the story contain a wizard? Output exactly one word: 'Yes' or 'No'. Do not provide any explanation. If the information is not found in the given context, respond with 'No'.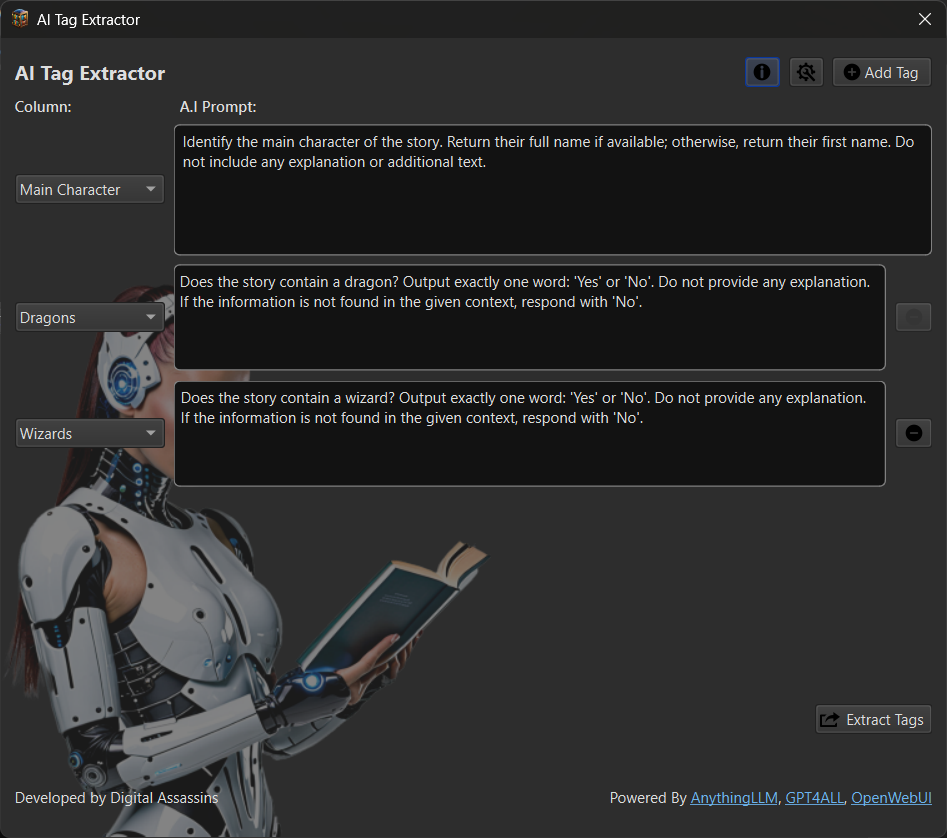
The input boxes for the questions I would like to have answered are now completed, and I’m ready to start tagging. I need to ensure AnythingLLM is open, running and ready to go.
Starting the Extraction:
For this Demo, I’m going to use a few of the eBooks that come preinstalled on my Pocketbook 4 eReader.
- Alice’s Adventures in Wonderland
- Jonathan Strange and Mr. Norrell
- Oliver Twist
- Study In Scarlet
- The Hobbit
Next, in the main interface, we select the eBooks or documents we would like to run the AI Extractor on. I clicked the keyboard shortcut “CTRL+A” to select all.

Clicking the “Extract Tags” button in the bottom-right of the window will start the extraction process.
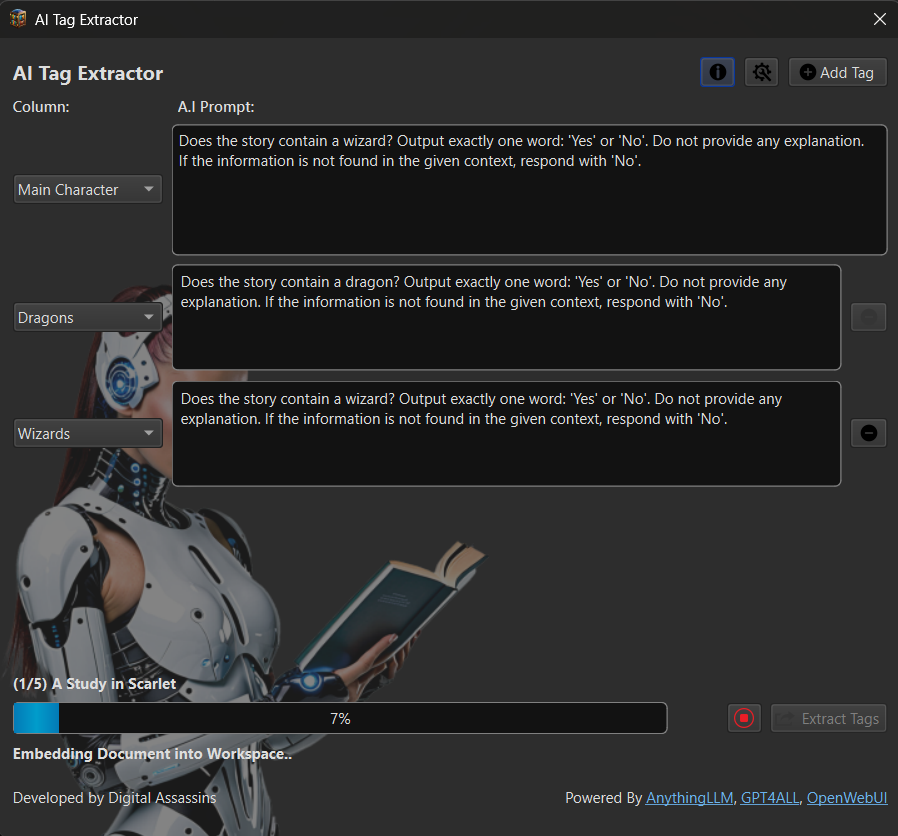
Once the process has started, you will see the progress bar appear at the bottom of the window.
- Above the progress bar is the current place (1/5) and the name of the book or document the AI is currently working on.
- Below the progress bar is the current task being completed.
- To the right of the progress bar is the stop button.
Checking the Process:
For this demonstration, I’ve chosen the model Deepseek because it will display its thinking process, which allows us to see how it arrived at the conclusion it did.
Here are the Debug log results of Deepseek R1’s reasoning for The Hobbit.
------------------------------------------------------------
Authenticating..
Authenticated!
Checking Workspace...
Workspace: CalibreEbooks Found
Checking if Document has already been Uploaded..
Document Already Exists!
Embedding Document into Workspace..
Document Embedded!
Pinning Document into Workspace..
Document Pinned!
Creating New Chat: The Hobbit J R R Tolkien epub Identify the main characte..
Chat Created!
Asking A.I. Question..
Identify the main character of the story. Return their full name if availab..
A.I. Thinking.....
------------------------------------------------------------
############             Thinking:              ############
------------------------------------------------------------
Okay, let's tackle this query about analyzing 'The Hobbit' for its main character. The user provided a specific context from what seems like an epub file, and they want me to identify the main character.  First, I need to parse through the given context to find any information related to characters.
Looking at the contents, there's no direct mention of a field called 'maincharacter'. However, the title page mentions Bilbo Baggins as the "reluctant partner" in the quest. The story summary also refers to him as the protagonist.  Even though the user asked for the full name if available, from what I can see, his full name is only given once: "Bilbo Baggins". There's no surname mentioned elsewhere except that one instance. But since the query specifies to return either the full name or first name, and here we have both parts of his name (first and last), it should be safe to use "Bilbo Baggins".  I don't see any other character being highlighted as central in this context. The rest are mostly supporting characters like Gandalf, Thorin Oakenshield, etc., but Bilbo is the one who undergoes the most significant development and whose perspective drives the narrative.  So putting it all together, the maincharacter field should be "Bilbo Baggins".
------------------------------------------------------------
------------------------------------------------------------
############             Response:              ############
------------------------------------------------------------
{"maincharacter": "Bilbo Baggins"}
------------------------------------------------------------
Response Received Successfully!
A.I thinking took 12.17 seconds!
Creating New Chat: The Hobbit J R R Tolkien epub Does the story contain a d..
Chat Created!
Asking A.I. Question..
Does the story contain a dragon? Output exactly one word: 'Yes' or 'No'. Do..
A.I. Thinking.....
------------------------------------------------------------
############             Thinking:              ############
------------------------------------------------------------
Okay, let's see. The user wants me to analyze 'The Hobbit - J. R. R. Tolkien.epub' and specifically check if there's a dragon in it. They provided some context which includes the title page, contents, author's note, chapters, and copyright info.  First, I need to look through the given context for any mention of dragons. Scanning through the content list, I see chapters like "An Unexpected Party," "Riddles in the Dark," etc., but none directly say there's a dragon except maybe in the title page where it mentions Smaug the Magnificent. Wait, actually in chapter 16, which is titled "A Thief in the Night," and the context snippet for that chapter includes "*Son of Azog." But wait, no dragon there either.  Wait, maybe I should check if Smaug is mentioned elsewhere. The title page does mention "the dragon, Smaug the Magnificent," so that info is present. So yes, there is a dragon named Smaug in the story.
------------------------------------------------------------
------------------------------------------------------------
############             Response:              ############
------------------------------------------------------------
{"dragons": "Yes"}
------------------------------------------------------------
Response Received Successfully!
A.I thinking took 10.07 seconds!
Creating New Chat: The Hobbit J R R Tolkien epub Does the story contain a w..
Chat Created!
Asking A.I. Question..
Does the story contain a wizard? Output exactly one word: 'Yes' or 'No'. Do..
A.I. Thinking.....
------------------------------------------------------------
############             Thinking:              ############
------------------------------------------------------------
 Okay, let's tackle this query step by step. The user wants to know if 'The Hobbit' contains a wizard based on the provided context.  First, I'll look through the given context. It includes various sections like the title page, contents list, author's note, and chapters. Gandalf is a wizard in Middle-earth, part of the Istari order. I can confidently answer 'Yes'.  But wait, the user's instruction says not to provide explanation unless necessary. The main point is whether the book contains a wizard. Since Gandalf is integral to the plot and well-known as a wizard in Tolkien's works, I can use that information.  So, putting together: The story does contain a wizard (Gandalf), Therefore, the answer should be 'Yes'.
------------------------------------------------------------
------------------------------------------------------------
############             Response:              ############
------------------------------------------------------------
{"wizards": "Yes"}
------------------------------------------------------------
Response Received Successfully!
A.I thinking took 10.94 seconds!
------------------------------------------------------------
Starting Cleanup Process...


Deleting Embedding..
Document Embedding Removed!
Deleting Individual Document..
Document Deleted Successfully!
Deleting Document Folder..
Document Folder Deleted Successfully!
Deleting Threads...
Thread Deleted Sucessfully!
Thread Deleted Sucessfully!
Thread Deleted Sucessfully!
All Threads Deleted Sucessfully!
Cleanup Process Complete!
------------------------------------------------------------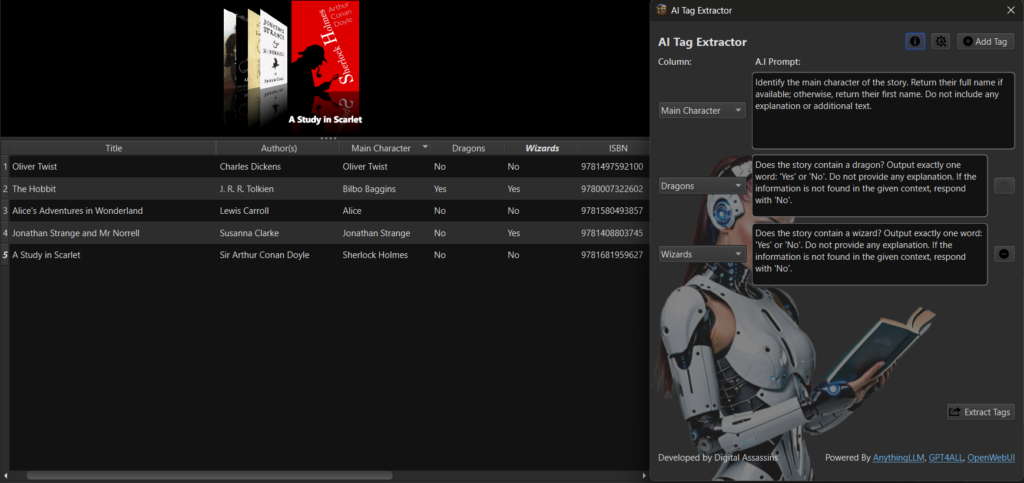
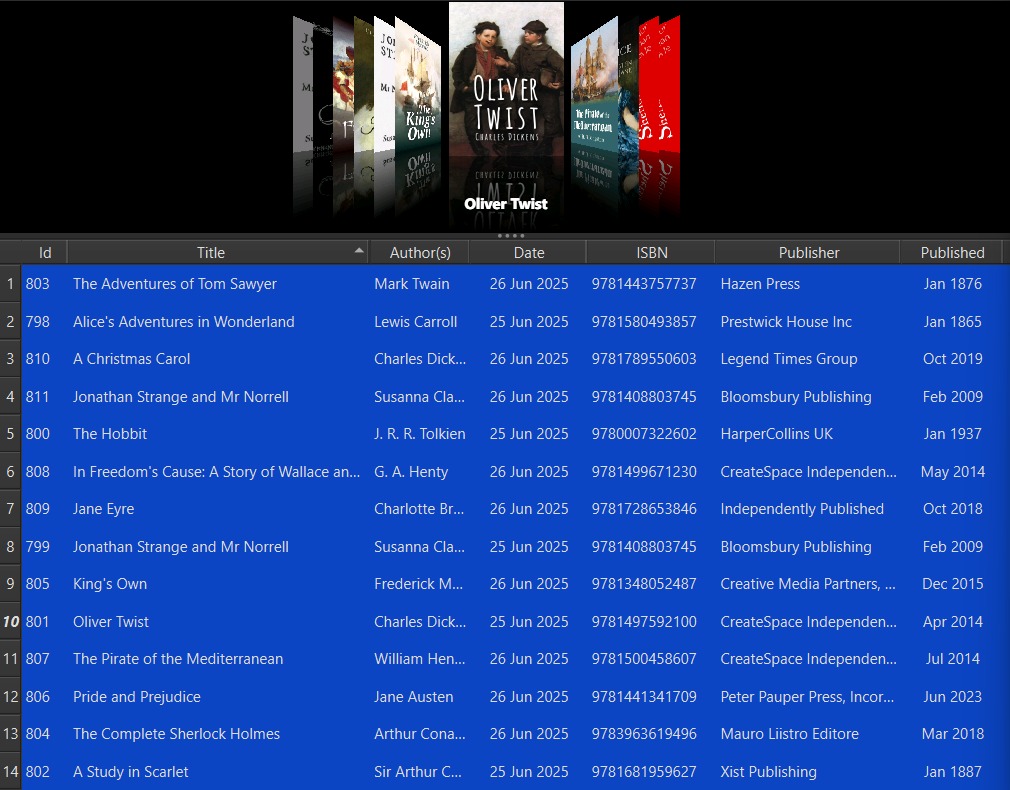
As you can see, that metadata is now stored in our Calibre database in the corresponding fields.
The data the AI returned was as follows:
| Title | Main Character | Dragons | Wizards |
|---|---|---|---|
| Oliver Twist | Oliver Twist | No | No |
| The Hobbit | Bilbo Baggins | Yes | Yes |
| Alice’s Adventures in Wonderland | Alice | No | No |
| Jonathan Strange and Mr Norrell | Jonathan Strange | No | Yes |
| A Study in Scarlet | Sherlock Holmes | No | No |
Filtering by Custom Metadata:

On the left-hand side of Calibre, with the filter, we can use it to find books based on our metadata.
To select all the books with Wizards in the story. We click:
“Wizards” > “Yes”
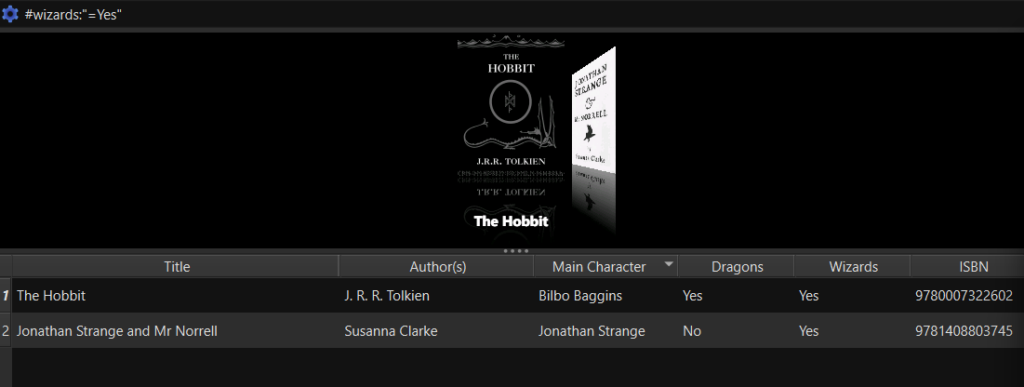
As you can see, we have now filtered out the two books that have Wizards in the story.
We can now “Embed” the metadata and “Save to Disk” to export our updated collection with embedded metadata.
🥳Process complete! You have just retrieved & embedded your custom metadata into your documents/ebooks using AI 🎉
8) Organising your eBook Library into Folders using AI & Calibre
Firstly, we used the “AI Metadata Plugin” to extract the main Metadata information.
Then, we used the “AI Tag Extractor” plugin to retrieve our custom metadata and embed it into our documents.
Next, I’ll show you how to utilise the “AI Tag Extractor” plugin to read back through the content and provide a folder structure to save each file into. Keeping documents & books grouped in the same RAG workspace prevents noise and provides better results.
This is useful if you have a big dump of documents that need organising and deduping. It doesn’t have to be used only on eBooks; it can be used on all types of documents.
We were recently contacted on Reddit by a student from Germany who had hundreds of thousands of tutor notes he needed to organise. It had taken him months to organise a third of them by hand. With this AI Toolkit, he organised the remaining documents in hours, not months. Let’s break down the process.
Adding Custom Columns:
Let’s first create a Custom column called “filestructure” by going to:
“Preferences > Add your own Columns > +Add Custom Column”
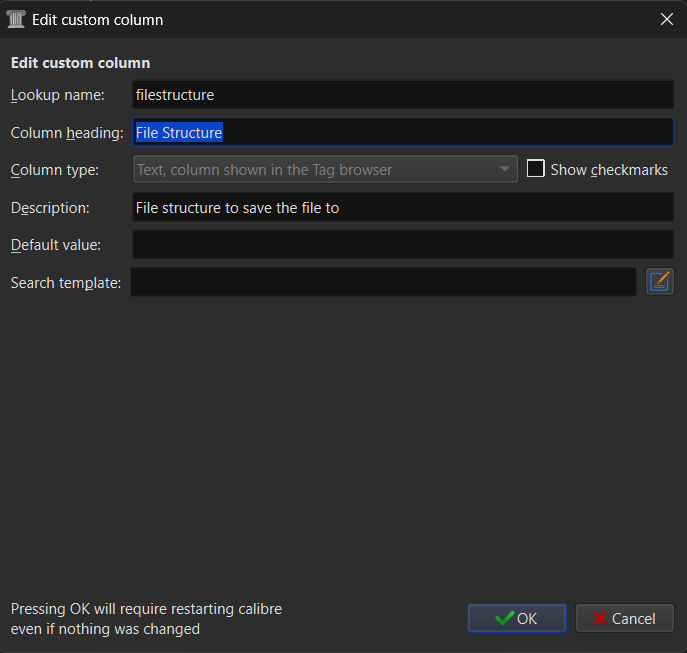
Type the label as “filestructure” and the Name as “File Structure” and choose:
“Text column shown in the tag browser”, then click “OK”
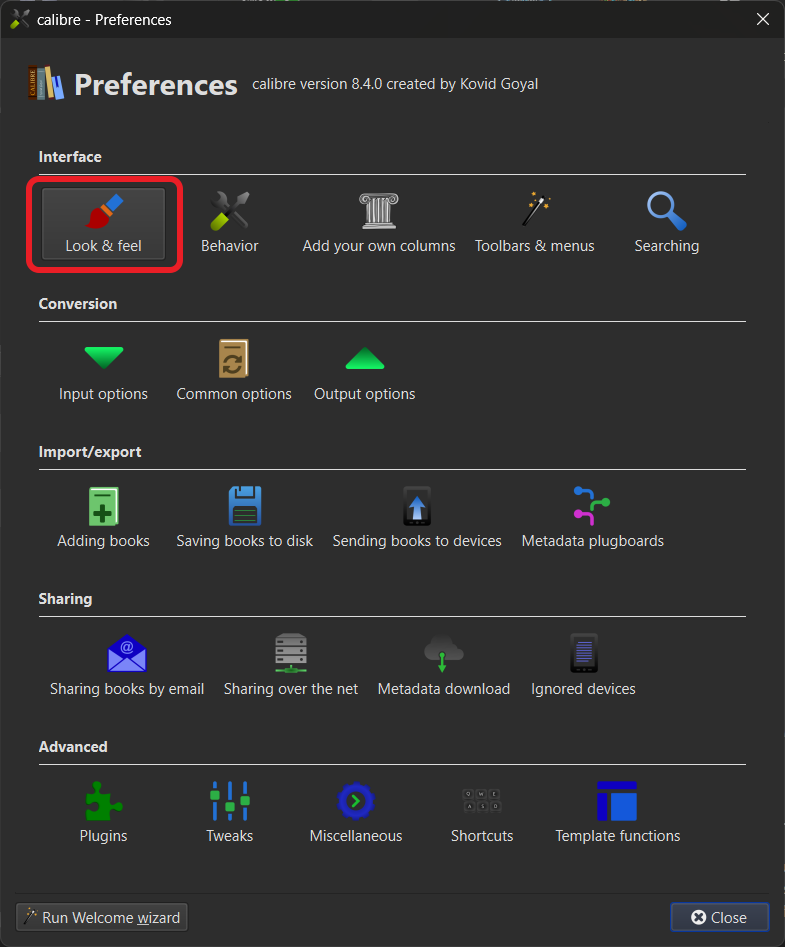
Next, we need to set the column as Hierarchical by going to:
“Preferences” > “Look & Feel” > “Hierachy & Searching Tab”
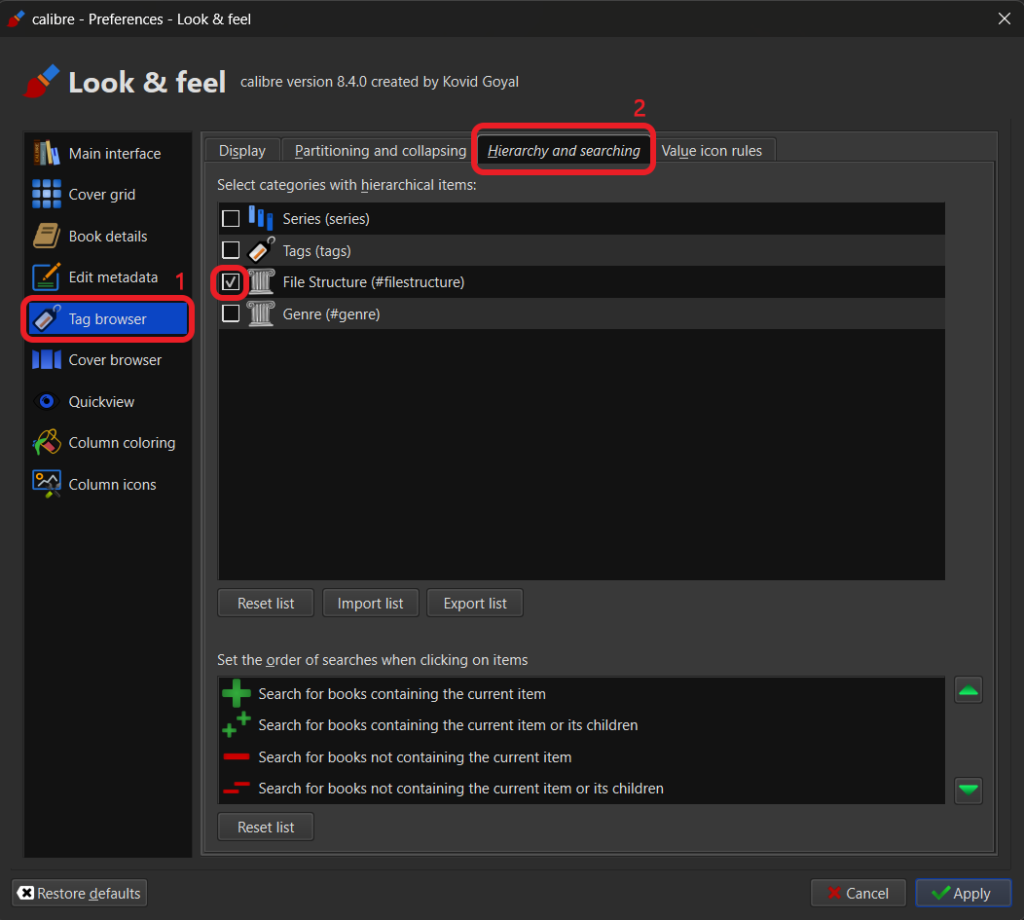
Then tick the box next to “File Structure (#filestructure)”, then click “Apply”
Setting up the Save Format:
The next step is to set the “Save format” template for the file output, to save each book into the correct folder.
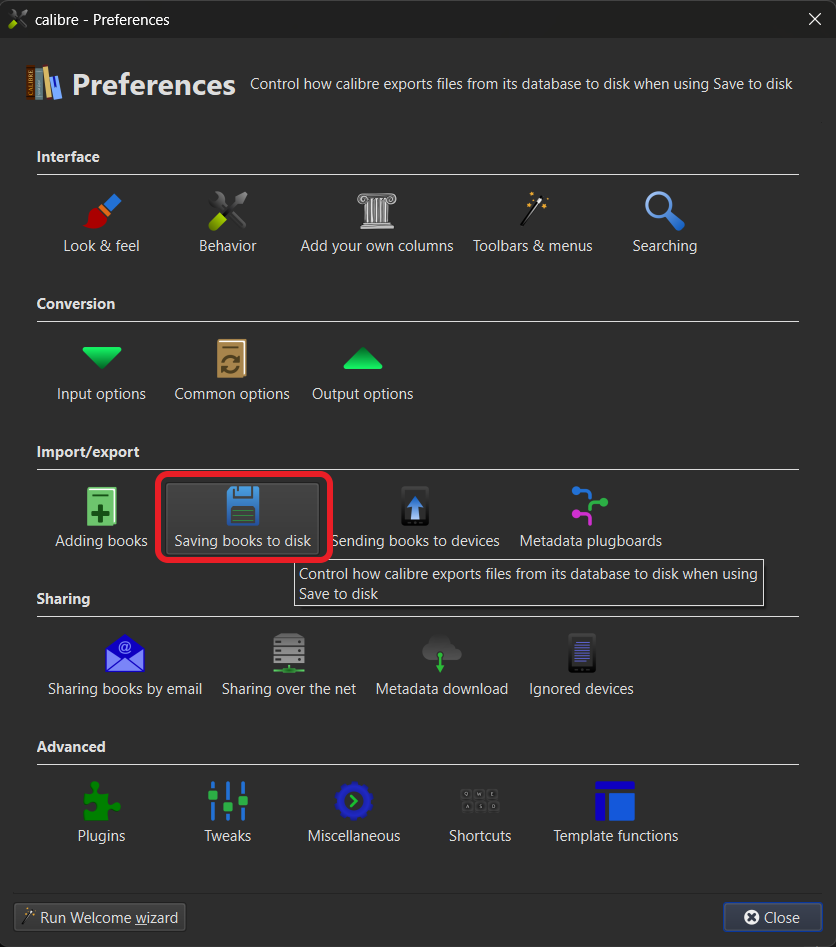
Go to: “Preferences” > “Saving books to disk” > “Template Editor”
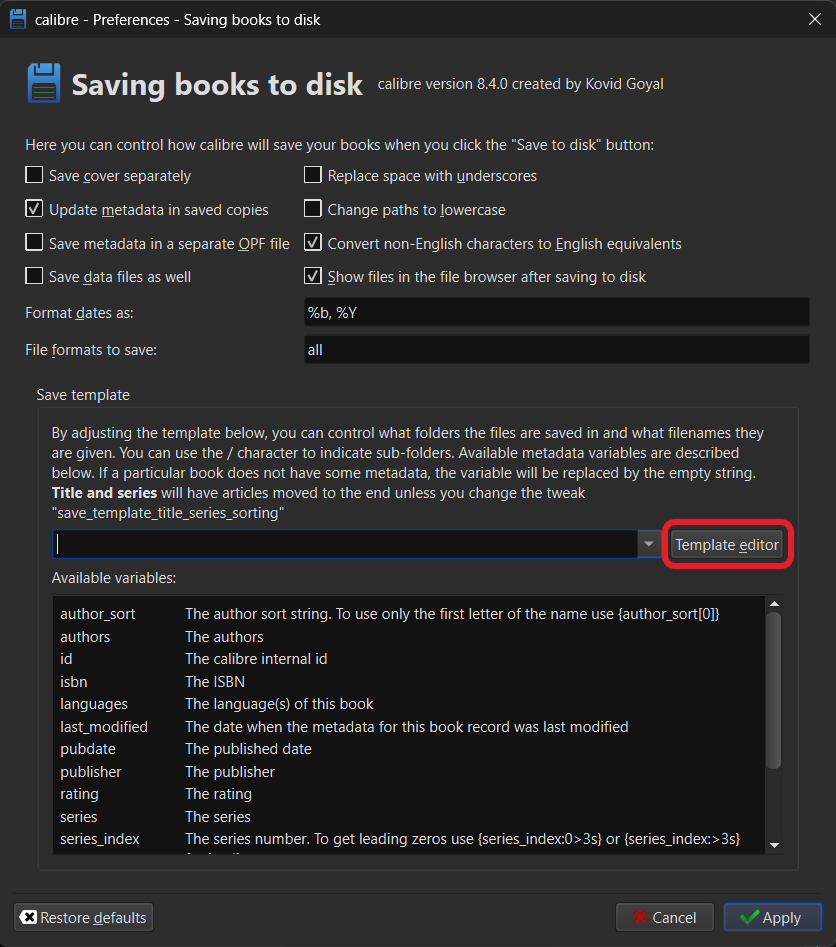
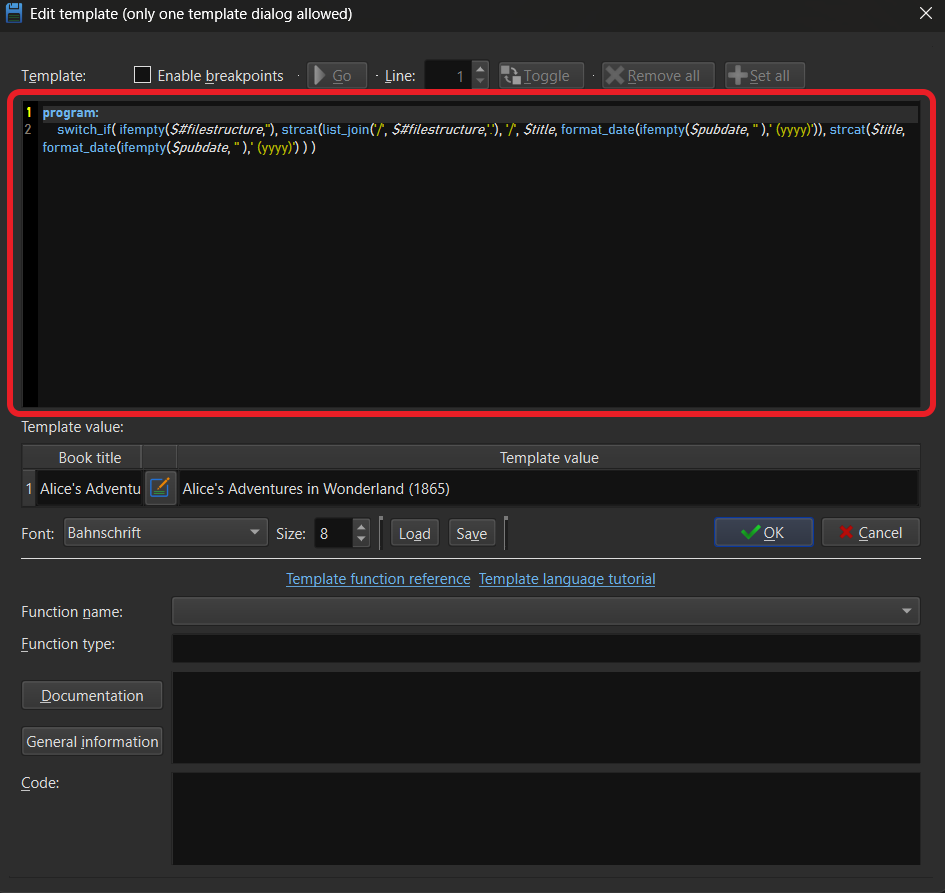
In the Template box circled in red in the screenshot, copy and paste the code below:
program:
switch_if( ifempty($#filestructure,''), strcat(list_join('/', $#filestructure,'.'), '/', $title, format_date(ifempty($pubdate, '' ),' (yyyy)')), strcat($title, format_date(ifempty($pubdate, '' ),' (yyyy)') ) )
This will output your files into the following structure:
Filestructure/Book Title (Year).pdfSo, for example, one of the books in my library has been automatically saved into:
Fiction\Science Fiction\Comedy\Red Dwarf\Better Than Life (1993).epubWe are now set up and ready to go..
Getting the Folder Structure from the AI:
First, select the books you want to organise. Since we require all of them organised, use the keyboard shortcut “CTRL+A”
Click the “AI Extractor” button in the top menu to open the plugin.
In the column, choose “File Structure” and in the AI Prompt box, copy the following:
Based on the book’s content, recommend a clear folder path using periods as separators and underscores for multi-word names; for non-fiction books, use the format [MainCategory].[Subcategory].[Topic], replacing these placeholders with actual subject names and never including the word “Nonfiction”; for fiction books, use Fiction.[Genre].[Subgenre].[Author_Last_First] (e.g., Fiction.Mystery.Detective.Arthur_Conan_Doyle); never include the book title in the path. If the book is non-fiction, do not create or include any folder named “Nonfiction,” “Non_Fiction,” or similar labels; the path must begin with the specific subject category only.You can modify this prompt to suit your own needs, if you so wish.

Then click “Extract Tags”
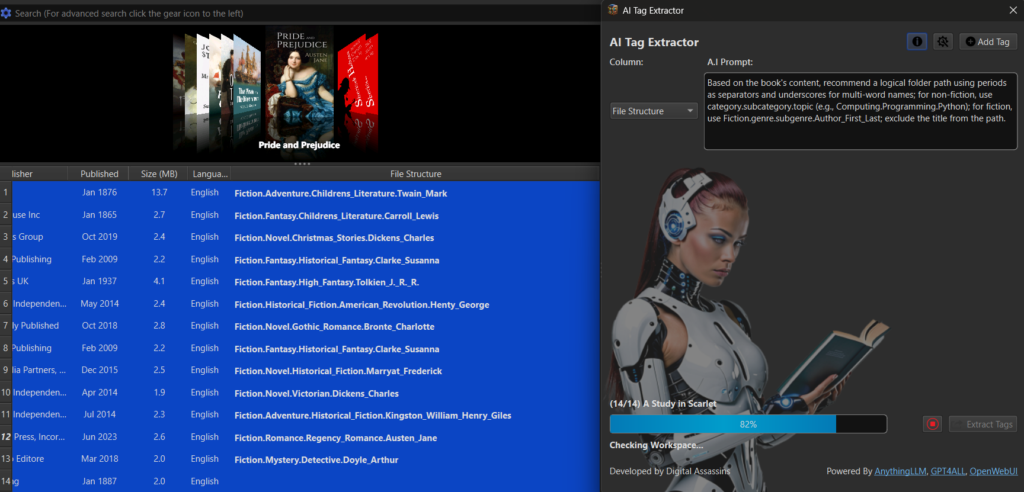
The AI then reads through each book and suggests a category for each. This is then saved to the file structure column in the Calibre Database.
I hit a snag, I had organised all my ADHD books into a folder “Mental Health/ADHD”!
Why has the AI put them in two separate folders?
It has put some of the books in “Self Help/ADHD” and some in “Medical/ADHD”, why?
On closer inspection, I realised that the AI is understanding not only the context of the content, but also the intended target audience.
The books in the “Medical” folder are aimed at medical professionals like Psychologists, the “Self Help” books are aimed at Parents / Individuals with ADHD.
I realised it is doing a better job than I could ever do by guessing the context from the book titles.
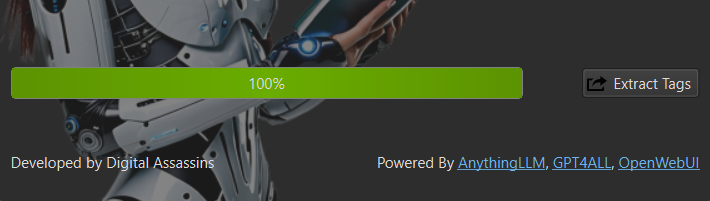
Once it hits 100% the job is completed.

Now we can embed the metadata in the eBook files using Calibre’s built-in
“Embed metadata” function.

Then, clicking “Save to disk” to export the files into the folder structure suggested by the AI.
We have just sorted our full library, found all the missing metadata and exported and organised everything into folders with a few clicks.
9) Downloading a different Model
Anything LLM out of the box is pretty much set up for what we want to do, but if you need to choose another AI Model to do the work. If you don’t like the outcome of the first model you chose, it might be worth your time installing another model and trying each until you find one that you prefer.
So, to install a different LLM model into Anything LLM is pretty easy:
We click the “Open Settings Wrench” at the bottom left of the application.
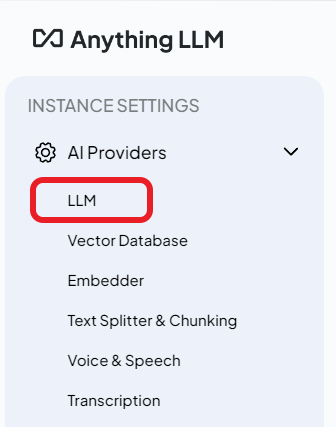
Then we choose “LLM” from the left-hand menu.
- “Anything LLM” as the LLM Provider
- Pick a model from the list below.
Once we have clicked and the chosen model is highlighted, we click “Save Changes” in the top right-hand corner of the screen. Just above the save button at the top, a message will appear, advising you that the model has started downloading in the background. The Model will now be installed automatically.
..A.I. has the IQ of a 3 day old Corpse..
Kovid Goyal
Troubleshooting:
Q. I’m not getting the same quality as in the demonstration, how come?
We used the model Gemma 3 12B on an RTX5000 series graphics card for the majority of these demonstrations. These models may be a little too big for smaller hardware. If you are restricted by your hardware, you could always try the new Gemma 3N model aimed at lower-end hardware. Alternatively, try the 1 Billion or 4 Billion Parameter model of Gemma 3.
Q. The AI is summarising random books and not the book I chose in Calibre. Why?
At the time of writing, AnythingLLM’s newest version 1.8.2 has a bug which makes the AI hallucinate and returns random answers. If you are experiencing this issue, you could try installing the stable version 1.8.1, which is the version I use in the demonstrations. This will be fixed in future versions.
Q. I’m trying to use the plugin with an online AI bot like ChatGPT, but the plugin keeps removing the URL. Why doesn’t it work?
The main reason we built these plugins is to complete the metadata and organise our books and documents using a LocalLLM from our local computer. You should not be uploading copyrighted material to a 3rd party service that states:
“We will use your data to improve our service” That is no longer personal use.
We have gone out of our way to block “anthropic.com”, “cohere.com”, “openai.com”, “mistral.ai”, “meta.com” and “api.google.com” to prevent this.
Q. I want to use the plugin to organise private files or sensitive company documents. Is it safe?
If you are using the plugin to organise your private documents, the documents will never leave your computer. If you check the answer to the question above, we have implemented measures to prevent documents from leaving your local network by blocking external services.
Q. You said you have blocked ChatGPT. Can you unblock it for me?
Due to copyright and privacy concerns, we believe using external services would not only breach copyright laws by transferring literary works to a 3rd party for storage and use, but we also think it’s detrimental to your privacy. We won’t unblock these external services.
Q. I’ve found an error. Where can I report it?
You can leave a post on our Reddit: https://www.reddit.com/r/DigitalAssassins/
Q. I prefer OpenWebUI, will you be implementing this?
Yes, we plan to release an update to use OpenWebUI in place of AnythingLLM. But we are building these plugins in our spare time. So please bear with us.
Thank You..
We hope the guide has been helpful, and we hope you found these plugins as useful as we have..
We have built these plugins in our spare time. They are free to use.. If you have found them useful, please consider buying us a coffee:

The Small Print
We work hard to ensure the accuracy and currency of the content. However, the information and service provided (including third-party information, products and services) is provided ‘as is’, that is, without any representation or endorsement made and without warranty of any kind. We accept no liability for, and provide no guarantee that, the functions and information contained in this site are error-free, or that this site or the server that makes it available are virus-free or represent the full functionality, accuracy or reliability of the materials.
Where errors are brought to our attention, we will take all reasonable endeavours to rectify them; however, we provide no guarantee that defects will automatically be corrected. We will accept no liability for any loss or damage, including, without limitation, indirect or consequential loss or damage arising out of or in connection with the use of our website. We also accept no responsibility or liability for quotations or personal opinions published in views, blog posts, opinion pieces or articles.
The laws of England and Wales shall govern your use of the site, and you hereby agree to submit to the exclusive jurisdiction of the English courts.